In-Depth Review: Geoff Sanoff On The Waves Vocal Rider
Let’s face it, compression is a great tool, but it doesn’t solve all the problems of keeping a vocal or dialogue track out in front. Compressors have a sonic footprint that, while often desirable, is not always what’s called for. By contrast, the non-compression tool we have for controlling dynamics in the modern DAW is automation. But while automating a channel’s volume/gain is a comparatively artifact-free option, it can be also be a significantly more time consuming process.
Enter Waves Vocal Rider, a new offering that has taken an interesting approach to the age-old problem of keeping the human voice up front in a mix. What makes Vocal Rider’s approach interesting is that it combines the efficiency of “set it and forget it” compression with the artifact-free response of fader automation.

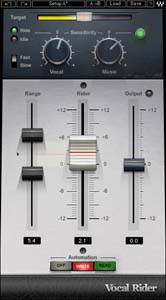
Vocal Rider has the familiar fader that moves as you’d expect it to and has a small set of parameters that are used to adjust the plug-in until the vocal sits where it’s wanted.
Visually, Vocal Rider is fairly straightforward. It has the familiar fader that moves as you’d expect it to and has a small set of parameters that are used to adjust the plug-in until the vocal sits where it’s wanted.
First let me just say that Vocal Rider is designed specifically for the human voice. I tried it on kick drum and bass guitar and it was a no go. After speaking with the very helpful tech support at Waves, I was able to confirm that Vocal Rider is intended entirely for singing and speech. To be honest, this was kind of a relief as the possibility of this technology eliminating another class of jobs in the music business (the mixer) was the thought that drove me to want to review this product in the first place.
You are supposed to put Vocal Rider as the last insert on the channel you intend to use it on. It needs to be post EQ and post compression in order to do its job most effectively.
The parameters Vocal Rider gives you to adjust are below. They are reasonably straightforward conceptually, but getting used to how they interact in practice can be a bit of a process.
Sensitivity: this discriminates what’s noise from what’s wanted in both the vocal and the side chain (if you engage this function). According to Waves, the “Vocal Sensitivity” distinguishes the vocal from ambience and sets word length (not to ride breaths or word endings). The Music Sensitivity is completely different — it sets how much of the music level will be accounted for when riding the vocals, so when music gets louder the vocal will get louder as well.
Target range: this is the overall level you want the vocal to sit at in a mix
Speed: the speed (fast or slow) at which Vocal Rider responds to level changes
Range: the overall db range of gain the fader will add or subtract. When you change this from its preset level, it changes the resting position of the fader to the midpoint of the overall range. So setting a maximum of +4 and minimum of -2 will put your center at +1db. This is important to note, because it’s where the fader will sit when no actionable signal is present. Additionally, the Idle line arrow adjusts the idle position.
IN PRACTICE: RADIO MAGIC, LANGUAGE BARRIERS & VOILA! VOCALS
Sensitivity is probably the most important variable, and the one that gave me the most issues. When it’s set right, Vocal Rider is like magic. It just keeps the words at the level you want them at and keeps the other stuff like headphone bleed or breaths below the surface.
On VO for some radio spots I was producing, I found it to be the best thing since sliced bread. It easily achieved the clarity I wanted without the extra squash of compression. It saved me from hours of doing vocal rides, and kept the VO on top and the breathing and artifacts of speech at a minimum.
I actually liked using it before a limiter too because I could get the dynamics right and then get that compression sound without bringing the breaths too far forward.
With music projects, I found it to be a little more complicated.
In addition to a sensitivity control for the vocal, there is a sensitivity control for the side-chain. You can set Vocal Rider to respond to both the incoming vocal as well as the rest of the instrumental track. But to do this you need to send the entire instrumental track to a bus. And that means you have to have delay compensation, otherwise getting this feature to work correctly is a big pain in the neck.
My initial test of Vocal Rider was on Japanese artists, Asian Kung Fu Generation. My thought was that since they sing in a language I don’t understand, this might be a quick tool to keep the levels where they ought to be. And because these songs were being mixed on a Pro Tools HD system, I could take advantage of its music side-chain function.
The producer’s reaction to Vocal Rider was amazement and I was excited that I’d been able to deal with the vocal issue so quickly. But as it turned out, lead singer Gotch’s reaction was less enthusiastic, as he felt that he could hear it kicking in too quickly (like a compressor) and that having his vocals so much on top made his voice sound unnatural. Backing Vocal Rider off, and moving it into Slow mode, didn’t solve this problem and only served to make it less effective. In the end we went back to riding the vocals the old fashioned way for these songs.
I felt like Vocal Rider could have worked if I knew Japanese and could have set it to respond more subtly. So I thought I’d try it on the Swedish folk-pop band Raymond & Maria who sing in English. It was definitely easier to hear what had made Gotch unhappy when listening to it on singing in a familiar language. In fast mode, Vocal Rider really can grab the transients in a noticeable way. Sometimes this is useful, like with VO, but on a nice jangly pop song, fast mode felt a little too static and controlled.
In contrast Slow mode while perhaps a tad too slow, was overall much closer to where I wanted it. And in general I found it to be better on singing in this mode.
On some singers, like Maria (of Raymond & Maria), Vocal Rider was pretty straightforward, and getting the sensitivity correct was not difficult. Having gotten it to properly identify the singing from the noise, I set the target where it seemed right in the track and then give her a roughly 6 db range (+3 db to -3 db’s). After putting it into the Slow mode, it was voila, vocals in front.
AUTOMATING VOCAL RIDER: FASTEST WAY TO A THOROUGH MIX
With a more stylistic singer like Obits’ Sohrab Habibion, using Vocal Rider was a somewhat complicated process. As a singer, Sohrab has a tendency to trail off his words for effect. It’s an approach that requires the mixer to use judgment as to how to make those trails sit right.
On the more sibilant trails, those that cut right through a track, you don’t need to ride them up. If anything they can be ridden down so they sink into the track, like an afterthought.
But knowing the intention of the singer is not something you can design software to anticipate. And so I found that setting Vocal Rider to ignore those passages often led it to ignoring the quiet passages where I wanted it to increase the gain. The same problem then existed for me in reverse, setting the quieter sections to be at the correct level, meant those stylistic trailings were often much louder than they needed to be, and required me to manually correct for them.
In those cases I found the most useful way to work was to record Vocal Rider’s automation and then to tweak the recorded automation manually. When in default mode, with automation disengaged, Vocal Rider’s response can vary from pass to pass depending on where you are starting playback. Starting from a loud vocal passage right before a quiet section, causes Vocal Rider to respond somewhat differently then it might, starting right on the quiet section. The upshot is that when you automate Vocal Rider, it works best when automating starting at the beginning of the track.
Once you’ve got your automation recorded, you can either put Vocal Rider into Read Mode where it will respond to this automation, and execute the same moves every time, or using the Pro Tools command <copy automation to current parameter> you can copy Vocal Rider’s automation onto the volume automation for the track. [Note: this function is not officially supported by Waves.]
In practice, I wanted to do this but found that having the volume automation as a separate trim to the more specific Vocal Rider automation a better way to work. That way, Vocal Rider would keep all the syllables in a given passage at an even level and then I could adjust the overall level relative to the section of the song I was working on. Thus if the overall vocal level in a chorus needed to come up, but was otherwise even relative to itself, I could boost the volume automation a dB in the chorus and let Vocal Rider handle the duties of keeping each syllable audible.
Working this way also made it easy to correct the things I didn’t want in Vocal Rider’s automation, like the previously mentioned vocal trails that are more of a judgment call then something you can program automatically. In this example, Vocal Rider wasn’t the fastest way to a quick mix, but it was the fastest way to a thorough mix and I was very happy with the results.
THE MOMENT OF TRUTH
Overall, I’d say that if you are doing production work — commercials, narration, books on tape, things with a lot of speech — you should run to the store tonight and buy this plug-in. It will save you time and give you cleaner results then a compressor, and in the pressurized environments in which these jobs often take place, that’s a big deal.
If you are working on music production, Vocal Rider is more of a nice option than a necessity. Once I got used to how it works, I found that the trick was to try it at the beginning of a mix. It became clear quickly which singers it would work easily with and which would require more effort. When Vocal Rider worked quickly it was great. When it was more of a tweak-out, then sometimes it still saved me time and sometimes it was too much of a hassle.
It’s definitely more useful if you work on a platform that has delay compensation like Pro Tools HD or Logic. The ability to sidechain Vocal Rider to the instrumental mix is one of its most useful features. On a platform like Pro Tools LE, using the Vocal Rider’s sidechain can turn into a number-crunching, delay calculating headache which renders this feature almost useless. (Perhaps someday LE will have full ADC built in)
The one arena in which I didn’t try the plug-in was the live sound version Vocal Rider Live, which includes an additional parameter to adjust for stage spill. It’s similar to the sensitivity parameter on the regular version. I don’t know how it works in practice, but I can imagine that it would be a fantastic asset to the live sound person in a club, if for no other reason that it will safely enable a stress-free, mid-set bathroom run.
If you are in the business of wearing many different hats and work across genres, then Vocal Rider is a very useful product. When it comes to a time crunch or a rough mix, Vocal Rider is something you’ll be glad to have available. In that sense it’s a very Waves product, a utility addressing a simple problem with a very thoughtful solution.
This has been a review of the:
Waves Vocal Rider
RTAS version
Pro Tools LE/HD
Native: $415
TDM: $830
http://www.waves.com/content.aspx?id=9945
Geoff Sanoff is a GRAMMY-winning NYC-based producer/engineer and musician who’s worked with Fountains of Wayne, A Camp, Obits, Blk Jks, Keith Urban, Michael Stipe and Green Day (among many others!). Contact Geoff through his management, Just Managing.
Please note: When you buy products through links on this page, we may earn an affiliate commission.


Matt Verzola
July 22, 2010 at 6:14 pm (14 years ago)I’ve just recently been using this on my VO work. It helps match the levels of different actors very well, and as you said—it’s all about saving time.
Sometimes I share sessions, though, so I tried to copy the “rider” automation to volume automation (a very cool feature, btw) so that another engineer without the plugin could work on my session. I found that it didn’t translate well, though, and required editing to match how it sounded with the plugin.
Thanks for the review!
Matt Verzola
July 22, 2010 at 11:14 am (14 years ago)I’ve just recently been using this on my VO work. It helps match the levels of different actors very well, and as you said—it’s all about saving time.
Sometimes I share sessions, though, so I tried to copy the “rider” automation to volume automation (a very cool feature, btw) so that another engineer without the plugin could work on my session. I found that it didn’t translate well, though, and required editing to match how it sounded with the plugin.
Thanks for the review!
Abhijit
August 18, 2012 at 1:37 am (12 years ago)Thanks for the review! I was going to buy either this or the aphex aural exciter on sale, but reading your review gives me insights into how it will be to use in the real world. I’ll take the exciter. 🙂