


The Best Peak Limiter Plugins on the Market
Peak limiters have become ubiquitous in music production. With the advent of digital processing, limiters can now “look ahead” and react instantaneously to audio peaks, providing true “brickwall” limiting and ensuring that the signal never gets louder than a predetermined ceiling—something that was impossible to achieve in the analog domain.
A peak limiter allows us to significantly reduce the dynamic range of our mix, in turn, allowing us to increase the average level. This comes at the cost of clarity and punch, and some added artifacts.
The differences between the peak limiters on the market however, lies in their ability to process the audio while minimizing the perception of those inherent artifacts and in just how much clarity and punch the signal retains after being processed.
A Brief Overview:
A great peak limiter can help maximize level with a minimum of artifacts.
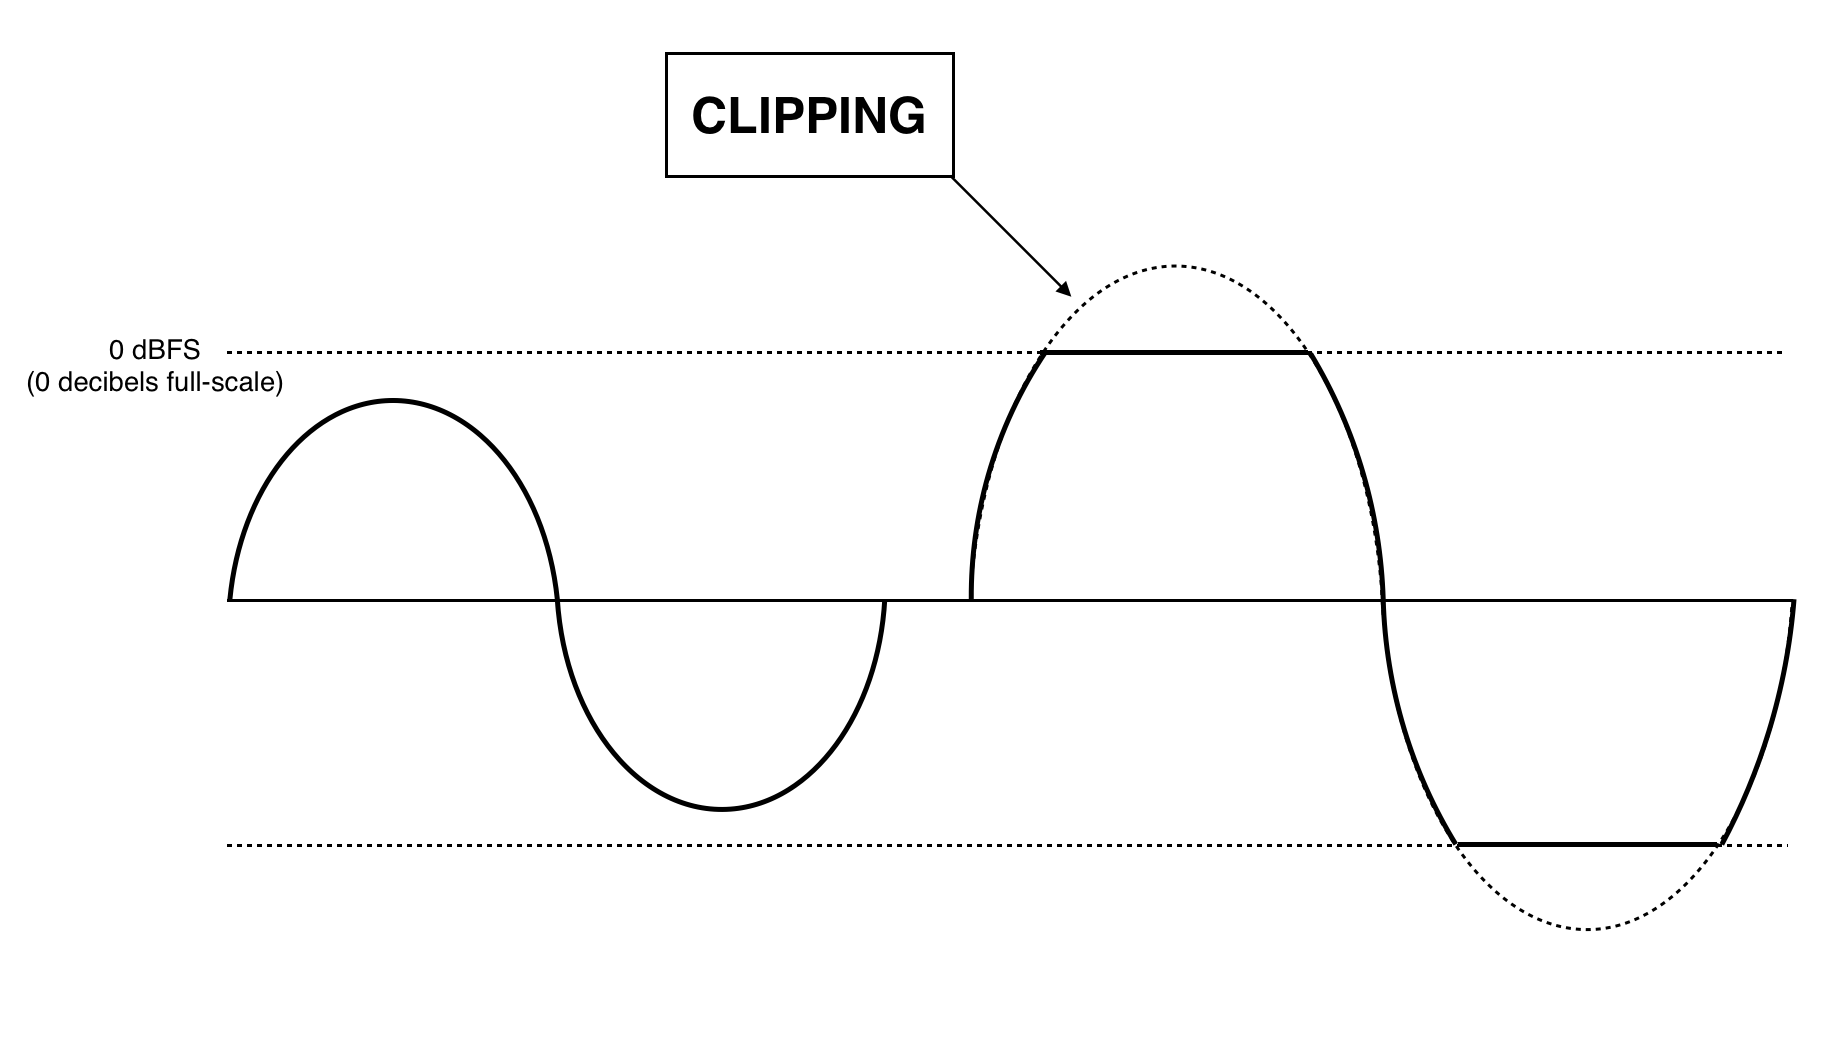
In digital audio, there is a definite maximum to how loud a signal can get. This is called “Digital Full-Scale.” Digital full-scale is represented by the reading “0dBFS”, which is just an abbreviation for “0 decibels Full-Scale”.
(In digital audio, anything lower than this is is represented in negative values. For instance: “-20dBFS” means “20 decibels below full-scale.”)
Without getting too technical, 0dBFS is the level represented by the very top of the meter, above which there is no way to encode any higher values.
If an incoming or outgoing signal gets any louder, it will cause the waveform to “clip.” The result is a distorted sound and loss of information, as the system is not capable of mapping and storing the portion of the signal that went above full scale.
The main idea behind a peak limiter is that if we first reduce the peaks in the waveform, we have room to bring up the overall level of the sound without going over the digital ceiling This results in an overall louder average level. But, because of the reduced dynamic range, this comes at the price of losing detail and punch. This kind of processing also introduces distortion into the signal.
Peak limiters are designed to help an engineer gain the most level with minimal artifacts—but limiters can differ in their ability to execute this task.
General Considerations
Our ears are complex instruments and the way we hear and perceive sound is quite different from the reading of measurement instruments such as a decibel meter.
In general, how loud something sounds to us is more closely related to the average energy of the waveform. The peaks themselves help us perceive detail and punch, but they contribute a bit less to the overall impression of loudness In general: The higher the peaks go above an average level, the more clarity and punch, while the higher the average level, the louder we perceive the signal to be.
There are a number of sophisticated algorithms that attempt to measure how loud a person will perceive recorded sound to be, and they are continually evolving as more research is conducted. Similarly, the detection algorithm of a limiter affects how different limiters react to the material they process.
The detection algorithm is one of the key differences between each limiter on the market, and it is a primary contributor to how transparent or colored audio will sound.
One more thing to consider is that each limiter may perform differently depending on the material it is processing. A universal truth is that applying more limiting to a signal will cause more signal loss and introduce more distortion. And it’s up to the engineer to decide where the balance lies.
Common Controls
The two most common controls we’ll find on peak limiters are Threshold and Ceiling.
The “Threshold” setting determines the point at which a signal is processed. Below the threshold, the signal will remain unaffected, and above it, the limiter will “kick in”. In the case of brickwall limiters, no signal can ever get any louder than the threshold. If a signal rises 6dB above the threshold, then the limiter will simultaneously lower the output by 6dB.
The “Ceiling” control determines the highest level the limiter will put out., and can be used to attenuate or boost the the output of the limiter.
One more control commonly found on limiters is “Release”. This allows the user to adjust how fast the limiter will return stop attenuating the signal once it falls below the threshold. Adjusting the release time can help achieve transparency, and minimize artifacts such as pumping and distortion.
Many peak limiters often include the option to ”Dither” the audio. Dither is a bit of very low-level noise added to the signal to help smooth out the noise floor of digital recordings. This setting typically lets you choose bit rate and they type of “noise shaping”. For a good explanation on dither, refer to this article.
The thinking behind including dither is that a peak limiter is usually the last processor in a signal chain, and you would typically want to dither the signal to a lower bitrate at the last stage before bouncing the final mix.
Other controls are unique to the operation of the specific limiter and I’ll go over these in more detail below. Read on for a roundup of some of the most popular peak limiters around, and a brief review of their operation, strengths, and weaknesses.
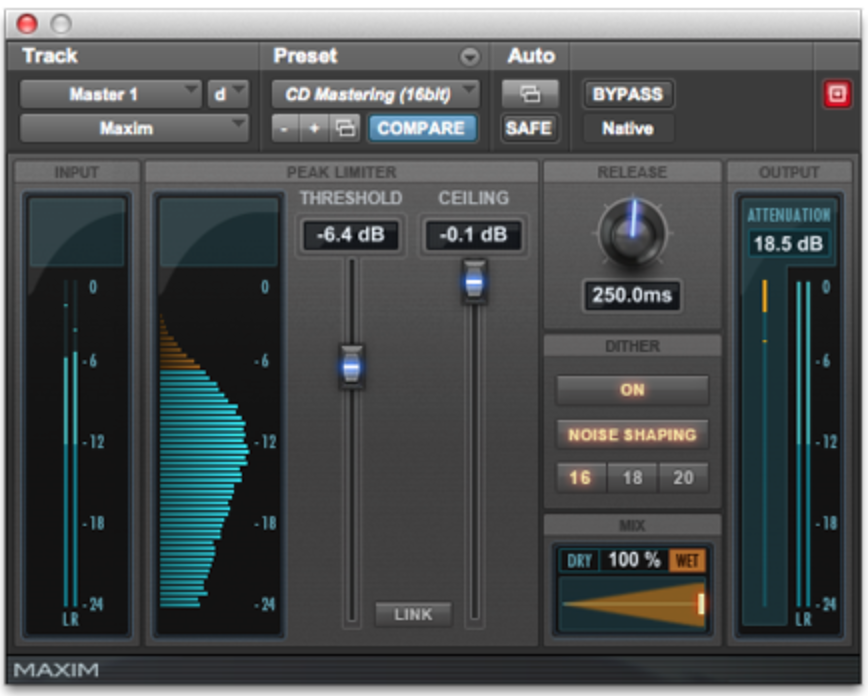
Avid’s Maxim serves as a basis of comparison as we look at some of the best and most flexible peak limiter plugins available.
Maxim is a limiter that comes bundled with the Pro Tools software. We’ve included it in this roundup to act as a point of reference as we analyze the strengths and weaknesses of the 3rd party alternatives on the market.
The two main controls here are the Threshold and Ceiling sliders: The Threshold moves along a unique histogram display, showing where most of the peaks are occurring in the signal. Lowering the threshold slider simultaneously raises the output level, so the signal gets louder as the slider goes down.
The Ceiling determines the maximum output of the plugin. Other controls available are release time, settings for adding dither, and a “mix” slider, which allows you to blend in some of the unprocessed signal for parallel limiting.
Maxim is straightforward to operate and is a very useful limiter. Not bad at all as a free option!
However, I find Maxim to have a pretty distinct color or sonic character, sounding less transparent or neutral than other limiters I use. Audio processed with Maxim tends to sound brighter than what went in, and perhaps a bit harsh.
In some cases, this can work well. But wouldn’t be a first choice if you want a warmer or more natural character.
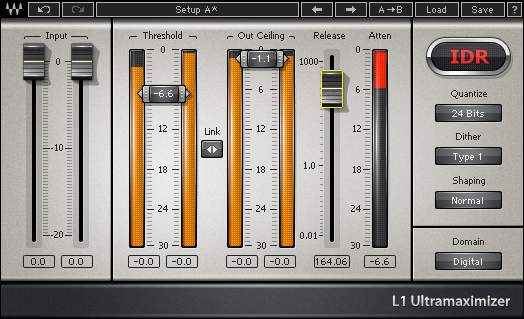
L1 Ultramaximizer: The one that arguably started a whole new genre of plugin.
The Waves L1 Ultramaximizer is considered to be a classic “look ahead” peak limiter. It was the first limiter of its kind to have such a simple interface, making its sophisticated algorithm very easy to use.
There are only two main settings to play with here: the Threshold and the Ceiling. Just as with Maxim, the Threshold slider adjusts two settings at once in a very intuitive way: As you pull down the Threshold, the L1 simultaneously raises the output level. The other slider, called Ceiling, adjusts output level. In essence this acts as an output trim.
The L1 also has a Release knob that adjusts how fast the limiter will return to an unattenuated signal once the signal falls below the threshold. The plugin allows you to add dither, applying a proprietary Waves dither algorithm known as IDR and has several options for noise-shaping.
This limiter preceded Maxim, and practically started a whole new class of tools. Many mixers still use this limiter on individual tracks, thanks to its much-used, aggressive tonal character, and relatively low CPU usage.
Similar in its controls and graphical interface to the L1, the Waves L2 Ultramaximizer differs from the original in ways that are mostly found “under the hood”, specifically, in the way the plugin detects and processes the incomming signal.
While the L2 functions in a very similar way to the L1, there is a significant difference in the way it sounds. Generally, the newer algorithm allows for more gain reduction before noticeable distortion when processing the mix bus.
The L2 also adds the “ARC” release function, which stands for “Auto Release Control.” ARC is a program-dependent release, which continuously adjusts the release time depending on the signal being processed. ARC helps reduce artifacts such as pumping to help give more transparent limiting.
The L2 was the first unit that Waves released as a stand-alone rack-mount processor, and that standalone unit is still found in many mastering studios today.
While the Waves L3 Ultramaximizer looks similar to the L1 and L2, this version has even more substantial differences under the hood.
The L3 features the same Threshold and Ceiling controls as the L1 and L2, with the major difference being that the L3 uses multi-band dynamics processing.
While the L1 and L2 use wide-band gain adjustment (all of the frequencies are detected and attenuated in the same way) the L3 detects and processes 5 different audio bands separately, allowing for more sophisticated processing.
This is intended to allow for increased loudness with minimized unwanted artifacts, and also offers variations in the way the limiter sounds. This plugin uses an algorithm that waves calls the Peak Limiting Mixer technology (or PLMixer™). The L3 Ultramaximizer is a streamlined version of the more comprehensive L3 “Multimaximizer”. The L3 Ultramaximizer looks essentially like the L1 and L2 limiters, but functions differently as explained above. The L3 Multimaximizer allows the user to adjust settings in each of the bands separately, giving more control over the plugin’s function. The plugin also comes in a few other iterations, including the low-latency version (“L3-LL”) and the L3-16, which uses a whopping 16-band peak limiter.
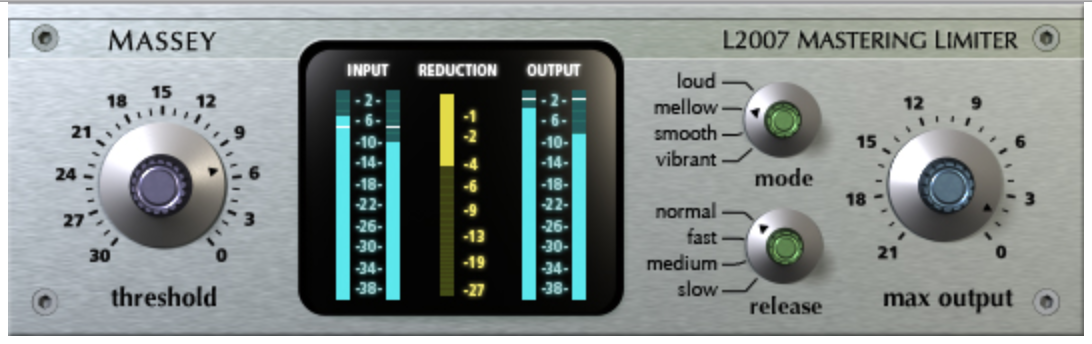
The Massey L2007: Easy to use, flexible, and often very smooth.
The Massey L2007 Mastering Limiter is another popular plugin, and it is comparatively inexpensive. This limiter sounds very transparent, and is quite impressive in its ability to achieve heavy limiting with very little audible artifacts.
Similar to other limiters, the L2007 offers two main controls: “Threshold” and “Max Output”. Like most other peak limiters, this plugin simultaneously increases the output level when you lower the threshold. As the name implies, the Max Output knob attenuates the plugin’s output from there.
There are two additional knobs here called “Mode” and “Release”.
Mode offers four different settings called “Loud,” “Mellow,” “Smooth” and “Vibrant.” These are characteristics that affect the plugin’s detection algorithm of incoming signal, thereby affecting the way it sounds on source material. Depending on the material the plugin is processing, these can sound pretty similar or fairly different from one another.
The Release knob offers four program-dependent settings, adjusting the release times to optimally react to the signal. The release settings are called “Normal,” “Fast,” Medium” and “Slow” settings.
Interestingly, “Normal” is actually the fastest setting. The other three release settings slow down those times. Like the release time, attack time is also program-dependent, and the plugin automatically adjusts the settings to optimally react to the incoming signal. The suggestion on Massey website is to remain on Normal for most applications, making the plugin very simple to use. Still, the option to adjust these settings can come in handy depending on the material.
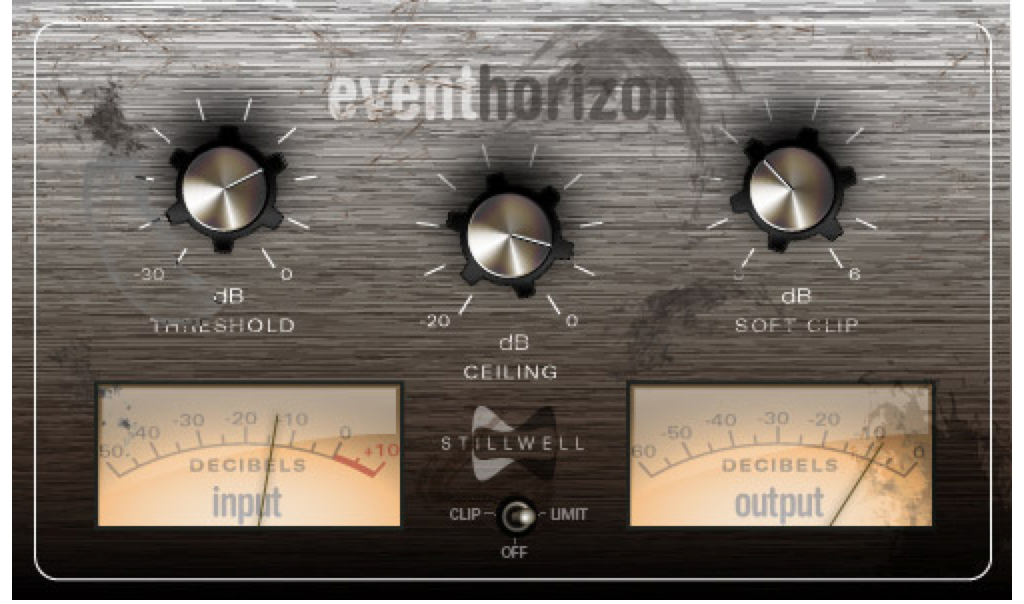
Stillwell Audio’s Event Horizon: A different breed of peak limiter altogether.
Probably the most unique plug-in of the bunch, Stillwell Audio’s Event Horizon functions as a hard-clipper—essentially chopping of the peaks rather than rounding them off as a limiter would.
I was taken back when first introduced to this plugin by a prominent mastering engineer, since up until that point, digital clipping was, in my mind, something to be avoided at all cost. I love how the field is always evolving!
The idea behind Event Horizon is that by clipping the signal, several dB of loudness can be achieved with no pumping and very little coloration artifacts. When done in a controlled manner, the distortion caused by the quick instances of hard clipping gives the sound an edgy characteristic that can be fitting in the right situation. The plugin offers three controls: “Threshold,” “Ceiling” and “Soft Clip.”
The Threshold and Ceiling function similarly to the other limiters. Threshold simultaneously raises the output level while lowering the threshold. Ceiling determines the maximum output of the plugin.
Soft Clip allows the user to round out the waveforms—a handy way to dial in the amount of “edginess” the plugin adds since it can get harsh at more extreme settings.
The plugin has an additional switch that allows the user to toggle between Clip and Limit modes. “Clip” functions as described above, and “Limit” makes the plugin function like a standard peak limiter. I have found that generally (depending on the program material and how low you set the threshold setting) I usually have a pretty clear preference of whether to use the plugin in “Clip” or in “Limit” mode.
As always, use your ears and adjust to taste. Event Horizon provides a large amount of flexibility allowing the user to dial in different colors and characteristics with these simple controls.

FabFilter’s Pro-L sports a ton of “advanced” features under the hood.
The FabFilter Pro-L is another very transparent brickwall limiter. Like other plugins in FabFilter’s collection, Pro-L offers some very unique controls and has an interesting, fresh take on the traditional graphical user interface (GUI).
Pro-L’ s GUI is centered around a scrolling graph, where incoming audio information is displayed from right to left. Using different shades and colors, this GUI displays input level, output level, RMS level, and gain reduction all in one place.
The operation is a little different from the limiters reviewed above — the main slider is called “Gain” and moving this slider up raises the level of the audio coming in. This is essentially opposite to the common approach on peak limiters, where you lower the threshold slider.
In this instance as you raise the gain knob, the audio hits a fixed threshold, above which the output level won’t get any louder. An output value under the meters functions as the output trim, and is simply labeled “out.”
An output trim knob appears when you click on the “Out” numeric value. Holding down the Option key while raising the gain knob will reduce the output level as the gain is brought up, keeping the output at one level as the limiter starts working. This helps you hear the effects of processing without an increasing signal level being a misleading factor.
A handy feature is the comprehensive metering section built into Pro-L. Here, you will find two sets of meters. The first shows the peak and average levels of the signal at once, and the second shows gain reduction, with a numeric readout of the maximum values for each meter. You can choose multiple metering calibrations, including the K-System meter scales (more on that in a post to come on speciality metering plugins). You can even view inter-sample peaks by pressing the “ISP” button. (More on that in our upcoming post as well!)
A unique feature to the Pro-L is the ability to engage its “oversampling” function, thereby changing the way the algorithm works. Engaging the oversampling mode is a way to reduce aliasing distortion and inter-sample peaks. You can choose from either “off,” “2x” or “4x” values with a drop down menu at the bottom of the GUI.
If you have an inkling to tweak more parameters, the Pro-L has an “Advanced” tab that brings up additional parameters you can tweak if desired.
Here, you can choose one of four different algorithms with the “Style” dropdown menu, altering the limiter’s behavior.
Also included in the advanced section is a knob called “Lookahead” giving you a rather unique way to affect the behavior of the limiter. Higher settings will make the plugin function as a brickwall limiter, while a very low setting will be closer to hard-clipping.
Attack and Release knobs included as advanced options affect the reaction times of a slower leveling stage, helping control artifacts such as pumping and distortion. And the last part of the advanced tab is called “Channel Linking”, which affects the stereo linking behavior of the limiter. This is another unique function not usually seen on stereo peak limiters. Finally, the plugin has built in dithering with several noise shaping options.
This limiter is extremely flexible, with many knobs available to tweak and several settings to choose from. Having all of these settings doesn’t detract from its basic and simple functions, however If you choose to refrain from opening the “Avdanced” tab the limiter will do a great job using only the simple “Gain” and “Out” settings.
By working with the default settings, I’ve noticed that the processed audio through Pro-L seems just a tad darker than the unprocessed mix. It’s not a bad thing, just a slight coloration, which is not at all unpleasant, but something to be aware of.

Universal Audio’s Precision Limiter is one of the most transparent options available.
Universal Audio’s Precision Limiter is the look-ahead brickwall limiter from the UAD Precision series. Different form many UAD plugins, the Precision series plugins don’t emulate hardware. Rather, they were designed from the start as digital processing tools.
Like all other UAD plugins, this plugin requires an external UAD DSP processor card or an Apollo interface to be plugged in, which will offload all of the plugin’s processing onto UA’s DSP chips. The Precision Limiter is a high-quality and very transparent limiter. It offers several metering functions which include Peak/RMS and the three K-System options K-20, K-14 and K-12 (more on the K-System on a later post). There is a separate gain reduction meter with a numeric reading of the maximum gain reduction applied to the signal.
The limiter features input, output and release knobs. Similar to the Pro-L, the threshold is fixed and you use the input knob to raise the level of incoming signal until reaching the desired amount of gain reduction.
The output knob determines the maximum output level. The release control, as labeled, controls release time, with an automatic release function engaged when this knob is turned fully clockwise.
Turning the release knob counter-clockwise will switch the limiter out of auto-release allowing you you set a constant release value. Under the release knob is a “Mode” button where you can switch between two different attack and release shapes for a different characteristic. According to Universal Audio “Mode A” is the default mode that is useful for most material, while “Mode B” is more gentle and is optimized for minimal or acoustic material.
Metering functions provide the ability to switch the meters to display input or output levels, a switch for changing the scale of the meters labeled “Zoom” and “Normal,” and three different peak hold times (3 sec, 10sec, and infinity). A “Clear” button allows you to reset peak holds.
Again, what strikes me most about this limiter is its transparency. The lack of even more advanced controls does not seem like much of a handicap when you are able to process your signal and have it sound so close to how you started.
Honorable Mentions
As with any roundup, this is not an all-inclusive list. It consists of the limiters I have experience using. Below are a few I’ve had limited or no experience working with, which still deserve an honorable mention here.
The ML4000 is McDSP’s peak limiter and a great one indeed. The limiter comes in two iterations – the ML1 is a wide-band limiter which offers simple yet powerful controls similar to the limiters reviewed above. These include “Ceiling,” “Threshold” and “Release.” A control somewhat unique to the ML4000 is the “Knee” control, giving the user another parameter with which to affect the behavior and character of the limiter. The other iteration, the ML4, adds a 4-band multiband gate, expander and compressor placed before the limiting stage.
Slate FX-G Virtual Mastering Processor
Slate Digital’s FX-G limiter uses a pretty unique process, explained on their website as “a dynamic and intelligent transient saturation system.” This is a part of the algorithm intended to achieve a “digital audio process that could increase the level of a mix without altering the punch and dynamic feel, or make the mix sound squashed and lifeless.” In essence it introduces saturation curves which are automatically optimized for each transient the processor detects. They call this process “Intelligent Transient Preservation.” I don’t have any experience using FG-X but the feature is intriguing and worthy of an honorable mention.
Another highly regarded plugin, this is Sonnox’s wide-band look-ahead peak limiter. A feature which sets this limiter apart is the “Enhance” fader.
This proprietary function aims to allow “unprecedented volume and punch to be applied to programme beyond that available from conventional limiting functions” (quoted from the Sonnox website). The limiter also offers monitoring of inter-sample peaks (via a button called “Recon Meter”) as well as the ability to apply multiple types of dither. I have yet to use this highly regarded plugin myself, and look forward to the opportunity. Sonnox plugins have a reputation of being of the quality and I’m sure this limiter will deliver great results.
Do you enjoy using a limiter which hasn’t been mentioned here? I encourage you to nominate your favorites in the comments section below!
Final Thoughts
There are quite a few options when it comes to peak limiters, and more are sure to come. Each limiter works slightly differently but essentially provides the same function of brickwall limiting, reacting instantaneously and not allowing any signal to ever get louder than a predetermined ceiling – not even the very fast peaks, thereby obtaining the name “peak limiter.”
The intended use for a peak limiter is to be inserted across the master bus in order to process an entire mix. Inherently the processing reduces dynamic range and raises the average level of the material.
Different peak limiters can vary in functionality and tonal character, and some are more flexible than others. Like every aspect of audio engineering, the choice of whether to use a peak limiter, which limiter to use, and how to use it is up to your taste and sense of aesthetics. As always, breaking the “rules” can yield some interesting results. Try these out and have fun!
Please note: When you buy products through links on this page, we may earn an affiliate commission.
ptfigg
July 23, 2015 at 1:03 pm (9 years ago)Have you checked out Nugen Audio’s ISL 2:
http://www.nugenaudio.com/isl-true-peak-tp-limiter-loudness-compatible-plugin-aax-au-vst_10
And Flux Elixir:
http://www.fluxhome.com/products/plug_ins/elixir-v3
Both highly regarded True Peak Limiters.
-paul.
AUDIONAUTAS
July 23, 2015 at 3:08 pm (9 years ago)The Tone Boosters limiter is my favorite, VERY clean sounding.
Graham Spice
July 23, 2015 at 4:27 pm (9 years ago)This is a reasonable plugin review with a good focus. That said, the author didn’t make much of an attempt to compare them or choose a “best” or “ultimate” as the article’s title suggests. Besides calling out the “bright” nature of Maxim, the author’s opinions were not generally shared here.
I was also surprised that 2 popular peak limiters were not included in this comparison: Slate’s FG-X and the Sonnox Oxford Limiter. I guess I can understand why the Limiter from Ozone was skipped but the other two are common choices for many engineers.
Ariel Hartung
July 23, 2015 at 5:52 pm (9 years ago)I’d add ToneBoosters Barricade to this list.
Ben Lindell
July 23, 2015 at 6:02 pm (9 years ago)Agreed Graham. While my personal favorite is the FabFilter I used the Sonnox Oxford Limiter on almost everything just for the “Enhance” fader.
Jay Levin
July 24, 2015 at 1:18 am (9 years ago)An article on limiters that doesn’t include PSP Xenon is useless.
john
July 31, 2015 at 6:25 am (9 years ago)Where is elephant?
Justin C.
September 10, 2015 at 10:29 am (9 years ago)Thanks for the recommendations Paul. We’ll check those out!
Justin C.
September 10, 2015 at 10:32 am (9 years ago)The Slate and Sonnox are two very popular ones, so we went ahead and added them to the “Honorable Mentions” category after the article went live. The Ozone isn’t really offered as a standalone, so it was outside the scope of this particular roundup. A very flexible and nice- sounding limiter indeed! Thanks for the nominations.
Justin C.
September 10, 2015 at 10:33 am (9 years ago)Thanks for the recommendation! We’ll check it out. You’re not the only one to mention it. No roundup of a major category is likely to be 100% comprehensive, but it’s nice to get as close as we can while still being useful.
Nick
January 8, 2016 at 3:05 am (8 years ago)Slate honorable mention?! That’s about the best mastering limiter outing market.
Joe Caithness
January 10, 2016 at 12:09 pm (8 years ago)no Voxengo Elephant? easily the best I’ve tried, been using it for 7 years!
ApathyNihilism
January 13, 2016 at 1:46 am (8 years ago)Great article…but no PSP Xenon? Waves L2 still essential indeed.
Oscar
February 2, 2016 at 4:53 pm (8 years ago)AOM Invisible limiter, the best IMO
Sal Paradise
February 5, 2016 at 9:35 am (8 years ago)if I may over-simplify, my TB Barricade makes my L2 sound like a fuzzbox….what a clean loud thing that TB is
John Klimeck
February 5, 2016 at 1:34 pm (8 years ago)I just did a shout out between: AOM Invisible, UAD Precision, and Nomad Factory Max Warm / Max Audio, Elephant and PSP Xenon. the UAD Prec was only ok, so it is out.
All on the master stereo fader, and just turned all of them off, and tried one by one.
All done on an Apollo Twin Duo, nylon guitar (Cordoba GK Studio). So this is solo acoustic nylon guitar.
I own and use the AOM, was the best for me…until now.
The AOM compared to the Elephant, Xenon, and Nomad is sterile, digital, cold. I noticed right away, the Elephant and Xenon sound (too me) way better than the AOM, smoother, clearer, warmer.
Now I have to decide between the Elephant or Xenon. Who designed the GUI for the Elephant, man that is ugly, the Xenon looks a lot nicer.
Rumi S. Hatt
March 16, 2016 at 4:51 am (8 years ago)Limiter No. 6 is missing, too. Free and good! And then there’s the new DMG Limitless.
Oversampling in FF Pro-L softens transients quite a bit. AOM distorted heavily in my tests.
I prefer Pro-L in Transparent mode, no oversampling, to UAD PrecLim and Xenon most of the time.
John Klimeck
November 15, 2016 at 11:50 am (7 years ago)Do Not under any circumstances buy the AOM Invisible Limiter. At first blush it looks good, but once you keep using it, you realize the controls / GUI are just damn odd, and it is very difficult to get consistent limiting across tunes. For acoustic music it is horrible, it will actually start introducing distortion (artifacts), it could be because the look ahead is not fast enough, who knows. Their support is horrible and would not give me a refund. Tone Boosters Barricade for $21 US total (No BS yearly subscription, listening AOM!) is far superior, I tested this against the Vox Elephant, Ozone 7, Pro Fab, etc. It sounds just as good as the Vox, and very close to the Ozone ($200, of course the Ozone really sounds great, but for $180 more?). To squash transients on acoustic instruments (fingerstyle nylon / steel guitar), or I would guess piano, it is awesome. Squashes the transients totally transparently, so the whole signal can be raised by 5 plus db, and your master fader level is very consistent, right up to -0.1 db (whatever you set), nothing is getting thru, no overs / clips, and no distortion, so clean and transparent, does not change the tone of my solo nylon guitar.
Manny E. Irizarry
November 23, 2017 at 12:54 pm (6 years ago)@johnklimeck:disqus dude, you’re tripping. The Invisible Limiter Gen 2 > TB Barricade I’m so sorry.
Manny E. Irizarry
November 23, 2017 at 12:58 pm (6 years ago)@Nick Slate FG-X is mainly good for its dithering and Detail knob for bringing the hi-hats to the forefront, but too much makes it clashy and mp3’ey. Another words, the Detail knob is good on transparenting the transient audio.
Manny E. Irizarry
November 23, 2017 at 1:01 pm (6 years ago)@jay_levin:disqus I’ll admit that the PSP’s Xenon is the closest thing I have heard to a great Analog Limiter in the Digital plugin domain. It’s K-metering is uber-accurate. However, I’d say that still the Invisible Limiter G2 is the best Analog-Digital (Hybrid) Limiter in the plugin domain hands the fcuk down.
Manny E. Irizarry
November 23, 2017 at 1:06 pm (6 years ago)@Rumi S. Hatt I have to be the contrarian iconoclast here, but as much as Voxengo puts out epic, colossal VSTfx plugins, Elephant vX is not the epitome in the plugin limiter domain; I’m sorry it isn’t. It’s better than Pro-L that’s for sure. Pro-L sounds distortive and non-transparent to my ears when pushed for lower RMS (i.e. a louder signal)
Manny E. Irizarry
November 23, 2017 at 1:07 pm (6 years ago)@Graham Spice Sonnox Oxford Limiter was good in G(en)1 of VST plugin limiters in the early 2000s, but it’s algorithm cannot compare to even the contemporary PSP Xeon nor Invisible Limiter G2. Sowwie.
Manny E. Irizarry
November 23, 2017 at 1:10 pm (6 years ago)@ptfigg:disqus Using Elixir v3 —-> Pure Limiter v3 or Invisible Limiter G2 on the mastering chain works wonders and gets you that low RMS with little THD. Do not push the gain on last limiter on the chain; only do that using Elixir v3. Some people master weirdly by pushing the I/O the last mastering plugin on the chain. I don’t like that. IMHO.
Godinho
December 4, 2017 at 5:09 pm (6 years ago)my vote goes to Slate FG-X