


5 Ways to Create More Realistic Bass Lines
Electric bass lends itself well to sampling—but you need to channel a bass player if you want a sampled electric bass part to sound convincing. These tips will help create bass parts where people will wonder if they’re from a sampler, or from a bass player with really good technique.
1) The Case for Space
The simplest way to improve realism is to leave a little space between notes, and avoid having the end of one note butt up against another. A bassist either has to lift a finger off a string to fret and pick the next string, or if the fingers are already in place and the object is just to pick a new note, a player will often mute any note that’s ringing just before hitting the next note. You needn’t leave a gaping hole between notes—a very short pause is sufficient.
2) Let It Slide
Lots of bass players use slides to transition between notes, or as a cool effect. When I sampled a Gibson EB5 5-string (for Cakewalk’s Dimension Pro and Rapture Pro), I mapped ten slides to keys below the low B—a slide down to the open string on each string, as well as an up/down slide for each string. Adding these to a part gives a much more realistic vibe. You can often shorten slides to add a little variety; for example with the up/down slide, trim the note to only the “up” part of the slide.
3) Fake the Frets
If your sampled bass doesn’t include slides, all is not lost—there’s always pitch bend, but then you’re locked in to a “fretless” sound. However, with a little work you can “quantize” pitch bend slide messages so they’re stepped instead of continuous, which emulates the sound of sliding over frets. This can also work when doing short slides from one note to another.
As a practical example, suppose you want a one-beat, octave slide up. If you set the instrument’s pitch bend range to +/-12 semitones and quantize the bend to 1/32nd note triplets, there will be exactly 12 steps in the slide. 16th note triplet quantization will give 12 steps over a two-beat octave slide, and so on. The only cautions are to make sure smoothing isn’t enabled for the pitch bend function, and if necessary, don’t forget to add a zero pitch bend message after the slide to return to the proper pitch.
For precise slides, if your sampler is set to +/-12 semitone bend range, then a value of 8191 bends an octave up (-8192 is an octave down, but no one will notice if you use 8191 for both). Divide 8191 by 12; the change in pitch bend values from one semitone to the next is about 683. For example, suppose you want to slide down from two steps above a note (let’s say A) to that note, and emulate sliding over frets:
- Enter the MIDI note for A.
- At the note start, enter a pitch bend value of 1366 (+683 * 2). This bends the note two semitones above the A.
- Between the start of the note and where it “lands,” enter a value of +683 (one semitone above the A).
Voilà! Your fretted slide.
You can determine the total pitch bend value change needed to cover a certain interval with the following formula (again, assuming a +/-12 semitone pitch bend range):
(8191/12) * n, where “n” is the interval in semitones.
For example, suppose you want to slide from five semitones below a note up to the note (Figure 1).
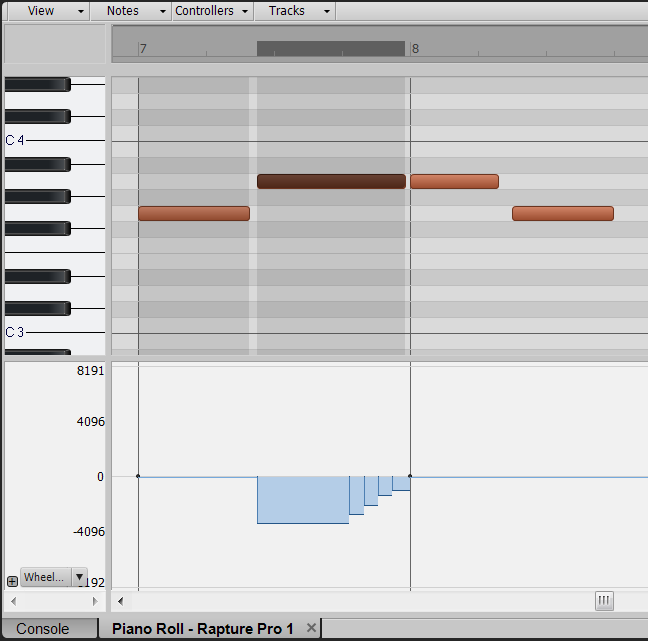
Figure 1: Adding the right kind of pitch bend can emulate sliding over frets.
Five semitones covers a range of (-8191/12) * 5, or -3412. You can add four additional events at -2731, -2048, -1366, and -963 to emulate the slide, but you really don’t need to be this precise, because often the notes will go by so fast the listener won’t be able to tell whether the intervening steps were exactly at semitone intervals or not. Just eyeball four equidistant events, and you’ll probably be fine.
4) Emulate Bass Processing
Although many electric bass parts are recorded direct, it’s common to supplement the direct signal with an amp, or even mic the amp by itself. Bass amp sims often sound very realistic (it’s easier when you don’t pile on heavy distortion—the hardest aspects of an amp sim to get right). There are dedicated bass amp plug-ins like IK Multimedia’s SVX and Overloud’s Mark Studio 2, but Native Instruments Guitar Rig, Waves G|T|R, IK AmpliTube, Peavey ReValver, and other amp sims aimed primarily at guitarists often include bass rigs as well. Also check individual DAWs (for example, Cakewalk SONAR has four bass amp sims I designed—see Figure 2).
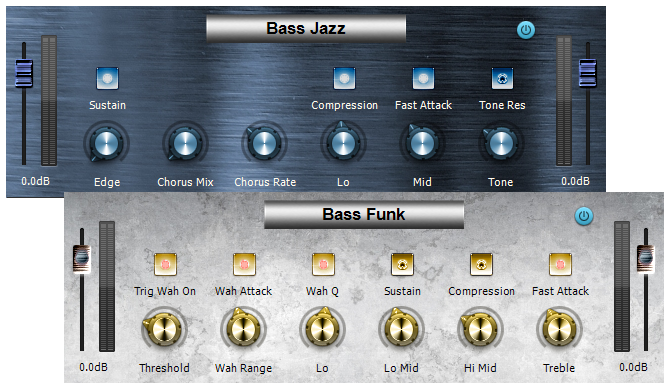
Figure 2: Two of the four custom bass amps in Cakewalk SONAR.
When using a cabinet, a little room sound doesn’t hurt either. You don’t need a reverb plug-in—you can obtain a very realistic room sound with four delays, set to short, prime numbers (e.g., 13, 17, 23, and 29 ms) and a single repeat. Mix these in subtly behind the main cabinet sound.
Also note that many bass amps let you crank up the highs for greater articulation. That’s not a bad idea with your EQs, either.
5) Mod the Mod Wheel
Mod wheel doesn’t have to control vibrato, and that’s particularly true with bass. Because you’re likely playing a monophonic line anyway, you can use your free hand to shape the bass sound using the mod wheel. As just one example, the initial pluck on a bass string pushes the pitch up quite a bit. You can add a slight pitch bend envelope to make it sound like you’re really hitting the string, and control the envelope amplitude with the mod wheel. Another option is to use it like the tone control on a bass, where rotating the wheel away from you reduces the highs. I also like using the wheel to add a suboctave, so that it sounds like I switched in an octave divider effect.
And of course, the most important way to create a realistic bass part is to remember you’re part of the rhythm section—lock into the drums, support the band, and play accordingly.
- Craig Anderton
Please note: When you buy products through links on this page, we may earn an affiliate commission.