Rick Slater’s Deconstructing the Project: Part II – Tracking!
Second in a series of in-studio tutorials by Rick Slater, NYC Producer/Engineer/Warrior. Check out Part I: Pre-Pre-Production HERE.
By now, the decision of which tracking facility to use has finally been made. In a delicate balance between vibe, gear, and cost, the ultimate studio for the task at hand has been chosen.
OK, let’s take a reality check here and say that there will always be the likelihood that something will go technically wrong on occasion. The mark of the better studios is the response to said issue and how quickly everyone can get back on track. Those are the studios I try to work in. The key character in this whole plan is the assistant engineer. He/she has probably the toughest gig of the day.
An assistant has to know what everyone has done, is doing, and will be doing in the immediate future. As an assistant to Michael Brauer, it was my job to make sure all the tapes were sent to us and that all songs were complete, all details filled in on the paperwork, etc. before a project. I learned to be really critical about documentation when I once (early in my career) let Michael mix only 24 of 48 tracks because the song title was not changed on the slave reel by the tracking assistant. As it turned out, I should have questioned a slave reel with a song that didn’t have a master even when it did not appear on the list of songs to be mixed. It’s ok to make mistakes but brother you better learn from them!
I just finished a gig with Derek Trucks featured on a song for Dr. John where the song title had changed and every new person involved had a moment of panic as they thought we were working on the wrong tune. Fortunately my moment came earlier and I had quickly gotten a handle on what was going on.
Now, as the engineer on a date it is very important that I convey all session details to my assistant. If you don’t have an assistant, it’s important to take a moment and document what you are doing along the way. As a mixer there is nothing worse than pulling up the track labeled “Audio 11”!
BE PREPARED, BE VERY PREPARED
Before the session, I speak with the client and I find out what it is we are looking to accomplish. It’s important that all of the artist’s gear is in top shape for the session. Sometimes additional rentals are involved and it’s important to use a reliable company with quality gear (i.e. Jim Flynn Rentals or Dreamhire for audio gear, Arty Smith and SIR for musical instruments.) Be sure that the studio is expecting a delivery of equipment and that everyone knows what time delivery is expected. I will often bring along my own gear to supplement the equipment as well.
For drums I have a spare key and moon gel to dampen the heads. For guitar I bring along a Little Labs PCP Distro to route to multiple amps, re-amping etc. I also have a rack of outboard with some vintage compressors and EQs. My “vibe bag” contains a few candles, a lamp, and a handful of vintage pedals too. I try my best to get to know the personalities of the people I will be working with and create an atmosphere that puts them at ease, yet gets them motivated to do their best.
On the day of the session I want to make sure that all the mics and outboard as well as cue systems are set up and tested before the client walks in. I once had to record Maureen McGovern live in the studio with her whole stage band for a children’s album. At the time Maureen was playing on Broadway and it was made very clear to the producer and me that she must be in her make-up chair at 5pm.
I had chosen Quad NYC’s Studio A for its spacious studio, control room, and three large iso booths with a great line of sight. As it turned out, one of the Pro Tools I/O boxes malfunctioned and caused the cue system to fail during the session. This meant that I had to calm the musical director’s nerves who was in turn making the young assistant nervous which led to the producer being agitated, while the entire process was being filmed. We were able to calm everyone down, identify the problem, replace the I/O and get rolling in about thirty minutes. I tracked the entire song, got an extra vocal pass for any fixes needed and had Ms. McGovern off to the theatre by 4pm. Phew! It was critical that day that everything was set-up and working prior to the session so that when the unexpected happened we were still able to accomplish our goal.
DRUM TRACKING – KIT & MIC PLACEMENT
When working with drum machines and synthesizers, the sounds are pretty much there to begin with, so a little subtle EQ and or compression to fit the song is usually enough. When working with live instruments, however, you will need to really get down to work. For drums it is critical that the condition of the drums are in top working order and that they are properly tuned. I use Moon Gel to dampen the heads if needed. They sound much more like the true nature of the drum then all the strange things which have been taped to drum heads in the past.
The first question is where in the room to put the kit. Assuming that you don’t have other instruments that require the use of the main live room, I like to put the drums in the main room and the other instruments in isolation.
I start by deciding if I want a tight or an open sound for the drums. I’ll walk around the studio talking, listening to how the room sounds and pick my spot.
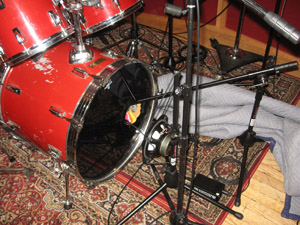
When getting sounds, I start with kick and usually use a dynamic mic like the Senheiser MD 421 or AKG D112 inside with a condenser like the Neumann U47 FET or Shure KSM44 out front. When I’m looking for a big bottom sound, I’ll add a sub-kick mic, which is actually a speaker used as a mic [Fig.1].
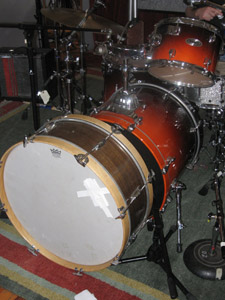
At times I have also used another drum as a resonator and miked that drum [Fig.2]. I use this technique when I want the kick drum to have an extended bottom end. When using a resonator, I mic it with a Large Diaphragm Condenser (LDC) fairly close to the head. (Remember it’s not being struck it’s just vibrating sympathetically.)
Next up I go for the overheads. This will capture the overall sound of the kit so I get the overheads right after the kick. The live kit is a whole so it is important that the overhead mics show the whole picture. I once had a tech comment on my good snare sound when in fact he was only hearing kick and overheads! I tend to like tube mics on the overheads, my favorite being an AKG C24 but LDCs work well too.
For snare, I always make sure that the drum we use is not occupying the same frequency range that the vocal will be in. This keeps the two most important elements of a mix (melody and rhythm) sounding big and up front. One of my secrets to great snare sound is to place the snare stand on a small piece of wood so the snare reflects up into the mics. I usually just mic the top with both a Shure SM 57 and a small diaphragm condenser (SDC) bussed to a single track. The 57, I mult to a gate and compressor and print to a separate track. This gives the drums a more finished sound right off the bat and gets everybody excited as the overdubs take place.
For toms, I usually go for an LDC and if printing to tape I slam it hard. If going to digital, some compression with medium fast attack and fast release are in line as well. For the room mics I prefer ribbons but LDC’s work well too. If you are experienced in the art of compression I say apply liberally to these tracks.
TRACKING BASS & GUITAR: MIKING AND SHAPING SOUNDS
A great bass sound comes from the player’s fingers and that’s a fact. I try to use a high quality DI, which I compress with either an LA3A or an 1176 and print to a track. If we are using an amp I listen carefully to the relationship of the DI signal and the amp as I slowly move the mic around. (OK the assistant moves, I listen.) Of course, you can address this issue inside your DAW, but I’ve had better luck getting a great bass sound by sticking to the basics of mic placement.
Acoustic basses may vary so you need to listen and consider the arrangement to make sure you are getting what you need from the recording. Often miking closer to the fingerboard is necessary to get the attack, other times the player might have a decent pick up that works well for this approach. I often combine a couple of mics. To get body, listen for the sweet spot — usually near the f-hole — and for attack I find a spot near where the fingerboard attaches to the body. I seem to have gotten my best results using condenser rather than ribbon mics. I follow a similar approach on acoustic guitar, using ribbon or condenser mics.
At this point I always have the bass player and drummer play together to make sure there is plenty of sonic space for each instrument.

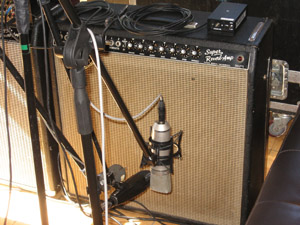
Fig.3 Tracking Derek Trucks' guitar, I used a blend of the Altec 633c and Neumann U87 on the Fender Super Reverb, which was fed from my Little Labs PCP Distro box, as was a Fender Deluxe miked with a Shure 57 and Neuman U87, which in turn were bussed together to a second track.
When recording electric guitars, I rarely use EQ except on the amp. Rather, I use a combination of ribbon, condenser, and dynamic mics to create the sound of the guitar. (Fig. 3) Rarely do I compress while recording a guitar amp as it already sounds compressed coming from the amp. One can get an edgier feel by miking closer to the grill, but I tend to back off 4-6” to allow the sound to bloom a bit.
If there is a mic up somewhere else in the room, I always throw its fader up and listen. Sometimes a splash of ambient mic really adds the right dimension to the part.
I’m a big fan of printing effects on the guitar if it’s part and parcel of that part. Like the gated and compressed snare track, it excites everyone as the recording continues and shapes the direction of the material.
One new technique I’ve tried successfully is to let the guitar player nail the performance at home with a direct signal and re-amp that. We used that approach with Cherry Suede. We booked time at The Clubhouse Studio, up in Rhinebeck, NY, where they had a gazillion amps and — in two and a half days — we re-amped 55 tracks of guitars. Of course, as we speak the state of amp simulators is advancing and using a real amp isn’t always necessary for re-amping. Again it is really important to take time to document your set-up; you never know when you might want to recreate a sound.
VOICE EXERCISES & SPACE EXPLORATION
I always record a scratch vocal while tracking. It helps the rest of the band mark its place and tends to elevate the energy level of the entire band. I go for the best vocal sound I can get in hopes of capturing the magic performance.
In my mind there is no go-to set-up for vocalists. I try a couple of things quickly so not to burn out my singer while keeping in mind how the vocal works with the track. Whenever possible, I try to set the right ambience for the singer in the space where we are working. (Remember the vibe bag?) I want the performance to transport me to the same place that the song originally took them when they wrote it, and sometimes you need to set the stage.
Now if the gear needs to be in top shape for the recording, imagine what a vocalist must do. Their voice is the instrument and that, too, has to be in top shape! If I am producing the singer, I like to have them involved with cardio-vascular exercise at least three times a week. I used to use a studio down on the Jersey shore where we would swim or jog for an hour in the morning before recording vocals. It speeds up the warm-up time in the studio and makes the end of a vocalist’s range much more stable.
Earlier, I touched on adding a little ambient miking and, truth be told, I am always looking for spaces that musicians sound particularly exciting playing in. If the space is exciting and it fits the song, then I make sure that I capture that sound in my recording.
My most favorite unusual spaces to record in over the years include: the elevator shaft at the original Sigma Sound, recording a Marshall half stack in the fire stairs of Quad NYC (that had the staff at Unique calling on the phone!), and the front over-hang in the drive way of Milkboy Recording in a residential neighborhood of Philadelphia.
OK, well that’s all for my approach on tracking — it would be great to hear about some of your more interesting set-ups!
Creating a great experience for musicians and capturing the magic that they produce isn’t an easy job but it is rewarding. Hopefully some of you will share your stories here as well.
Rick Slater is a NYC-based producer/engineer who’s recorded and/or mixed with Chuck D, Robben Ford and James Chance, and worked in NYC studios such as Mediasound, Quad and Sony. Meet him on Myspace: http://www.myspace.com/rickslater.
Please note: When you buy products through links on this page, we may earn an affiliate commission.


