


Using Multiband Compression to Conquer Proximity Effect Issues
What is the Proximity Effect?
The proximity effect describes how bass frequencies build up when a microphone is brought very close to a sound source. This effect frequently occurs when a vocalist moves around a lot while singing, varying their distance from the microphone diaphragm from phrase to phrase, or even within phrases. These slight movements can impact the < 100 Hz frequency range with as much as a 16 dB boost!
Q: Why does this effect occur, though?
A: Pressure Gradient Compensation + The Inverse Square Law
The proximity effect results from a combination of pressure gradient compensationfactors in microphones and the inverse square law of sound energy, or intensity, as it propagates from a source.

Behold the inverse square law.
Specifically, microphone designers must build in compensation to account for the greater pressure differences that high frequencies impose upon a microphone’s diaphragm, but when the diaphragm is brought close enough to its sound source that the source intensity itself applies greater pressure on the diaphragm, the compensation throws the output signal out of balance, leading to apparent bass boost (in fact, it’s actually a cutting of higher frequencies). The exact mechanics and math behind this phenomenon are covered in this article.
But regardless of why this effect occurs, we can all agree it certainly presents us with a problem. Working with an input signal with this much variance in a single frequency band makes it difficult to work with in a mix, and also in tracking where compression and/or EQ are part of the recording signal chain. No doubt, most engineers would prefer to work with a more consistent source (or a more consistent vocalist!), but it’s not always an option.
Conquering the Proximity Effect
Since we will all encounter this at one point or another during tracking or mixing, we must have some tools ready to tackle it without significantly impacting our processed signal. We can start with some best practices.
1. Attempt to Eliminate the Problem at the Source
During the tracking phase, we can provide some coaching to the vocalist so they understand the impact this might have on their recording. Even then, though, they may not be trained enough to properly heed the warning, and in some cases it may not be appropriate to “get in their head” right before a recording session. Luckily, an easier solution is to simply place a pop filter at a sufficient distance in front of the microphone that they will not be able to cross into the proximity zone.
Additionally, some microphones have built-in EQ features that can be taken advantage of to minimize issues during tracking. The Shure SM7b, for instance, has an 80 Hz rolloff that can be switched on during recording, which can help address both proximity issues and subsonic boominess that can result from a mic stand being touched even quite lightly.
2. Adjust Signal Processors During Tracking
But what if despite our best efforts, there is still a noticeable and obvious effect taking place? First, we may want to ease up on any broadband compression or EQ that is being committed to disk during the recording. After all, a broadband compressor can dull the signal as a result of high frequencies being attenuated when lower frequencies trigger the compressor.
If you must use compression on the way in, consider getting around this issue with side-chaining, splitting the source signal off on a second cable run, filtering out the lows, and then using this output signal to feed the compressor’s side chain. Note that while this will resolve the dulling effect, the proportion of incoming highs and lows will be largely unaffected, and will likely require further processing.
3. Reduce Severity with Shelving or Filtering
At this point, let’s say you have your recorded sound and it still has some obvious proximity effect issues. Despite our best efforts, we will all wind up here, so now what?
Regardless of the proximity effect, most vocals will sit better in a mix when we shelf or filter out most of its low frequency content. This is good, because it means we will already be removing a healthy portion of these frequencies from the vocal mix, making this part of the frequency spectrum relatively less important than the midrange or higher frequencies. However, while shelving or filtering will change the relative balance of lower frequencies to higher frequencies, it will not affect the relative differences within the low frequencies occurring from the proximity effect. Thus, there may still be noticeable fluctuations in low frequency composition as the vocal track plays back.
Note that even if the differences are not audible, if these occasional “spikes” in low frequency content are not addressed, they have the potential to affect the mix by adding unnecessary energy in the lower register, where we really want to keep things neat and tidy for our kick and bass.
4. Applying Multiband Compression in The Mix
Finally, then, this is what leads us to the multiband compressor as an excellent solution to resolving this issue. The key principle behind multiband compressors is that you can take a broadband signal, “split” it into a number of frequency bands, process each of those bands, and finally recombine them into a complete, whole signal again. This tends to work great in situations where the incoming signal spans across most of the frequency spectrum, since it allows us to hone in on problem areas with a laser beam, performing surgery on those areas without affecting the remaining frequency bands.
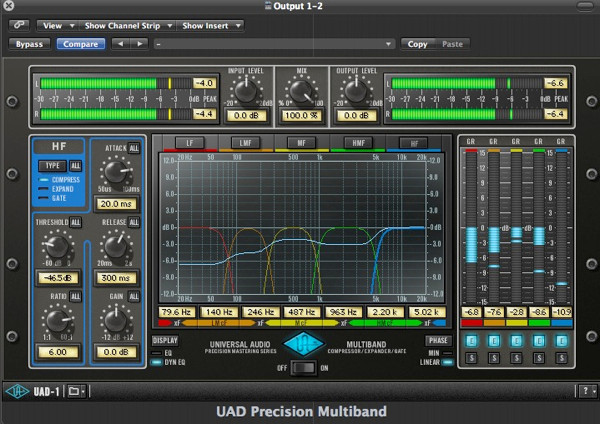
The Universal Audio Multiband Compressor.
Historically speaking, analog compressors were not historically used very much in mixing due to the relatively high expense of purchasing one (an analog multiband compressor is in fact several compressors along with expensive, high quality crossovers). They were used in mastering, though, and thanks to the advent of modern technology, are now common in everyday DAW use, too. For example, Universal Audio’s Precision Multiband Plugin comes recommended by several professional engineers, and is relatively inexpensive at $249.99. You can also build your own within your DAW, but be prepared to compensate for potential phase issues at crossover frequencies.
When you’re ready to get to work, the implementation is surprisingly easy. Once you load your multiband compressor onto your source track, you will first want to set your crossover frequencies. Note that some multiband plugins come with fixed crossovers, in which case you will simply want to focus on the lowest band (or two). Otherwise, you are free to adjust the boundaries yourself to really get this dialed in.
From here, there are two basic strategies you can use, not to mention you are free to play with the crossover settings to taste on your own:
A. Capture the entire proximity effect with one fairly wide band
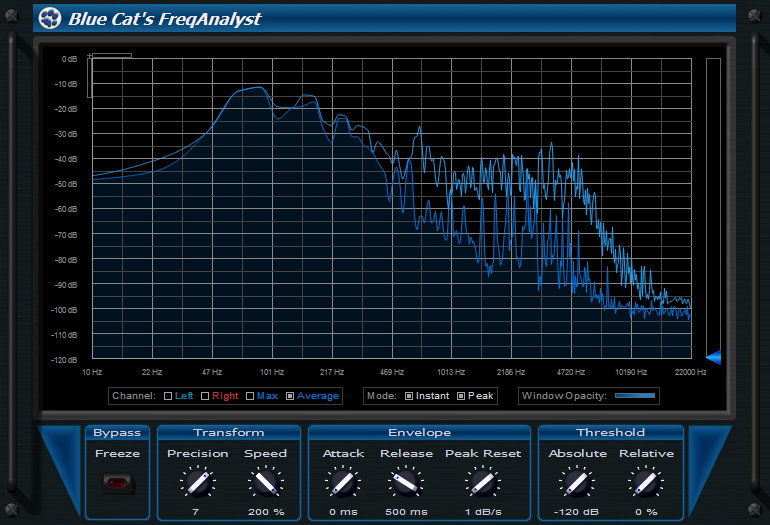
Your eyes can help your ears via Blue Cat Audio’s FreqAnalyst.
This is the most straightforward way to proceed. Simply identify the highest frequency where the proximity effect is spiking (Blue Cat’s FreqAnalyst is a free spectrum analyzer that can help you confirm this visually), then set your crossover frequency at or just beyond that point. In most cases, the effect is most prominent below 100 Hz, but due to microphone pressure gradient compensation factors, will occur well into the low mids. This may be true well up to 500 Hz, but is likely no longer significantly noticeable beyond about 250 Hz.
Therefore, you may choose to set your crossover frequency around 80 Hz, 100 Hz, 125 Hz, 200 Hz, or even 250-300 Hz depending on what you’re hearing in your mix. It may even be beneficial to play with this crossover frequency and listen to how it affects signal output inside and outside of your mix, too, before committing to one.
Once you have these settings locked into place, you can apply fairly heavy compression to the offending band, adjusting input gain and/or makeup gain to taste, in order to level out the low spikes that occur in the source track. Adjusting the input gain will cause the threshold to be reached more easily, and depending on the compressor or plugin you are using, may lead to a more noticeable compression “effect” or distortion. On the other hand, adjusting the makeup (output) gain will simply raise the level of the entire output signal, and may lead to more transparent results.
Ultimately, by narrowing the dynamic range of our very dynamic bass frequency band, we can achieve a more even, smooth sense of presence in the mix — one that is more controlled, balanced, and easy to work with. Importantly, with a multiband compressor we can achieve thiswithout affecting the character of the remaining frequency bands. But with that being said, you may even want to tidy up some of the other parts of your lead vocal while you’re in there!
B. Split the lows and low-mids into 2-3 bands, and address each of them in a step-wise fashion
In this situation, we are performing essentially the same task as above, but with a higher degree of precision and control. For instance, you may identify up to three bands to work with and clamp down on them with varying degrees of compression to maintain dynamics and musicality in your mix.
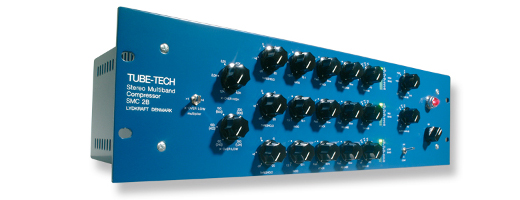
Serious hardware: The Tube-Tech SMC3BM.
Common settings might lead you to setting a crossover frequency at 80 Hz, another at 240 Hz, and yet another around 480 Hz. Fast-attack, heavy compression and/or limiting might be applied to the < 80 Hz range, with decreasingly slower attack and lower ratios for the next two bands. Due to the nature of compensation, thresholds may need to be adjusted as well, since the effect will diminish in level and intensity as we climb up the frequency spectrum. I would recommend beginning with a low threshold (one that is easily triggered) in the lowest band, and then raising the relative threshold in the next two bands to preserve transient response unless more control is required.
It is also worth noting that you may need to spend some time playing with attack and release controls to achieve a natural sounding result. This is true in Case A above, too, where you are only operating on one frequency band. Is your vocalist only very occasionally, and very quickly coming into close contact with the mic, or is he/she right up on the microphone for long periods of time? Faster attack and release times might suit the former case, whereas longer times may suit the latter, although there is no one-size-fits-all solution.
If your vocalist has both of these problems, it may even be necessary to split the vocal input track onto 2-3 tracks and apply different multiband settings to each of them; one for the quick spikes, one for the long, close-up phrases, and perhaps a third for anything in between. These can then be routed to a bus that acts as a single channel for the vocal for later processing.
Conclusion
As a final note, I would recommend multiband compression be applied early on in the mixing stage, before filtering or shelving even, such that you have a balanced and even signal to work with throughout the remainder of your mix. While it can be applied after filtering, shelving, or other processing, realize that doing this subjects you to resetting all of your fine-tuned multiband settings should you ever change one of the signal processors (such as a shelf or filter) that come before it.
On the other hand, putting the multiband compressor first, at the beginning of the signal chain does not severely impact the rest of your processing chain, since you are merely balancing the dynamics of the input signal. This may actually make it easier to set, and continue to adjust, processors that come later in the chain. It’s much easier to adjust the overall response of the lows, for example, by simply moving your shelf up or down a few dBs, for instance versus adjusting your shelf and the multiband unit as a connected, interdependent and complex device.
Thank you for reading and please stay tuned for more helpful tips in the future.
— Steven Fies is the founder of CreativeEdgeMusic.com and enjoys mixing and mastering music in his spare time. As a guitarist of many years, he has written and recorded music with Weight of the Sun, and co-founded Bassics Studio in 2013, a 600 sq. ft. professional recording studio in San Diego,CA that focuses primarily on music of a heavier genre. For any questions, please feel free to contact him directly at steve@creativeedgemusic.com.
Please note: When you buy products through links on this page, we may earn an affiliate commission.
stone11
January 2, 2015 at 11:39 am (9 years ago)Thanks Steven. I really enjoyed this article and appreciate the tips you gave for setting up and using a multiband compressor. Keep up the good work.