


Review: Steinberg’s Cubase Pro 8 – By Andrew Koss
Presented with the opportunity to write a review about a DAW, my initial reaction was, “How can anyone cover an entire DAW in a single article?”
Cubase Pro 8 is the latest version of Steinberg’s full-featured DAW.
The project was to take Steinberg’s Cubase Pro 8 for a serious test drive. Years ago I was primarily working with Cubase 3, and shortly after that, Nuendo, and I always admired Steinberg’s ability to create a visually elegant and immersive user interface that still puts the primary focus on functionality and feel.
However, as I began to think about essentially being forced to learn a new program, it seemed like the task could be worth pursuing. While my recording facility is primarily a Pro-Tools HD room, I was looking for a DAW that would fit nicely with the work I like to do away from the big room, mostly on a MacBook Pro — a program that would really make composing, writing, and exploring ideas easy and fun.
All of us who regularly work with DAWs, regardless of which one we lean towards, can say there are features we love and others that we wish we could write out of the code immediately. Inevitably, we develop a workflow that gets us working, and as we conform to this way of doing things, it can become increasingly more daunting to even consider trying anything else out. I’ve been reluctant to try adapting how I work for years. So this opportunity seemed like a fortuitous one, and I gladly accepted.
Jump forward a few days, and I’m looking at the 1,337 page manual that’s included in Cubase Pro, thinking, “What have I done?” Did I really want to re-learn the methods I’ve come to love, or at least begrudgingly accept? Looking at the blank session, I took a deep breath, and dove in.
INITIAL THOUGHTS
First, let me unequivocally report, Cubase Pro 8 is certainly worth taking for a test drive. The program is overloaded with fantastic features that make working creatively and quickly a breeze. It’s designed from its core to cater to anyone who writes, produces, composes, or just wants to creatively explore music. Workflow is remarkably fast, and the customization possibilities feel nearly endless. For those familiar with Pro Tools, there are a lot of similarities in the project window that certainly make the transition easier.
Diving into Cubase Pro 8, you start coming across features that you’ve dreamed you could have in your DAW. When I discovered that all plugin and virtual instrument selection windows had a searchable text bar at the top, for example, I got misty-eyed. And then upon learning that you could not only “playlist” audio and MIDI tracks but also a songs tempo track, allowing you to try completely new tempo ideas or totally different musical ideas with new tempos, well I may have shed a few tears. We’ll get back to some of these more detailed aspects later on.
There are two glaring issues that I have with Cubase Pro 8, and I would like to lay those on the table before diving into the many aspects that Steinberg got right in this DAW. I cannot understand how anyone developing new software today can force users to give up a USB port just to run the software.
As of late, there’s been a big push to move towards cloud licensing, and other forms of copyright protection that do not require users to have a USB dongle — what companies like Adobe and Waves have done are terrific examples of this. In Steinberg’s case, it’s also a dongle that a majority of consumers and pros don’t own, which means anyone who wishes to demo Cubase Pro 8, is required to have one of these eLicensers or go out and spend $25 to get one. This fact alone might discourage quite a few people from ever trying Cubase.
Secondly, Apple has been putting retina displays in their computers since 2012, and now three years later, Cubase is not yet optimized for these displays. Cubase is a creative environment, with a highly detailed user interface, and much of those lovely details end up looking blurry and pixelated on a retina display. (According to Steinberg, support for retina display is coming in the near future. – Editor)
With those two gripes aside, let’s get on to the good stuff.
Features/Overview
Here are just some of the noteworthy features in Cubase 8 Pro.
• Render In Place for bouncing MIDI and audio tracks quickly.
• Loads of VI’s and Plugins provide lots of creativity right from the box.
• Plugin Manager allowing users to customize plug-in lists in any manner.
• VCA Faders for deeper automation and mix control.
• Channel Strips on every track including EQ, Dynamics, Saturation, De-Essing, and Gating.
• Quick Link Grouping for temporarily linking parameters of several tracks without grouping them
• Transient and Tempo Detection – real time transient detection to effortlessly slice audio
• Chord Pads/Chord Tracks – Chord-based intelligent composing tools.
• Re-record Mode gives you a do-over with one key press when you’re recording
• Score editor – for creating printable notation from your parts.
• Track presets – instantly create a track preloaded with the plugins/patches you commonly use
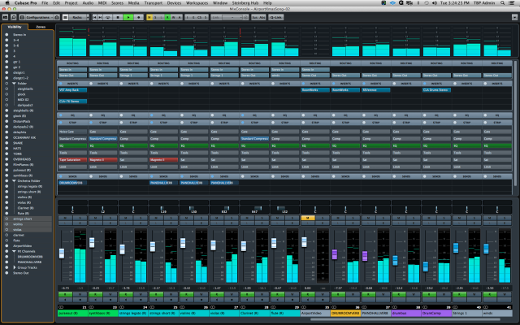
The Cubase Pro 8 mixer.
AT THE CORE
In many ways, what you are presented with on each track itself speaks volumes for what Cubase is all about. Click on a track and you get quick access to lots of parameters, automation, routing, sends, EQs, customizable quick controls, transposition, velocity thresholds, quantization, beat detection, and the channel strip.
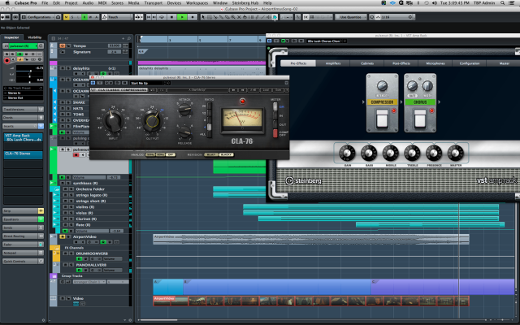
Having a ready-to-go channel strip that works even while recording or input monitoring can come in very handy. The channel strip’s components sound quite good and certainly are more than enough to do basics, even if it’s just to keep a track controlled while tracking, doing a headphone mix, or just doing a quick mix until you get into your preferred plugin.
The EQs have a slickly designed visual element that displays the frequency response of the source and as you work with the EQs, any changes are displayed visually across the graph. While I’m generally a proponent of EQing with your ears and not your eyes, this kind of feature makes identifying problem frequencies simple, and allows you to correct accordingly.
The project and mix window both allow for easy editing and comping. Track folders allow you to neatly group your tracks. Multiple automation parameters can be accessed at the same time and each are shown in their own lanes — having access to this is a huge help when dealing with complex VIs with lots of MIDI CC automation happening.
Global controls are displayed across the top of the project window, allowing you to globally or selectively mute, solo, transpose, or change key velocities. Audio is beat- and transient-detected as it is being recorded, and this can make editing, slicing, or quantizing audio a quick process. The transient detection is very refined and can be adjusted for greater detail.
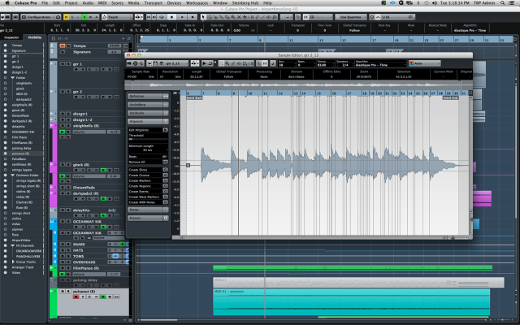
Cubase real time transient detector and slicing.
QOL features
Many of the really great aspects of Cubase are quality of life features that in the grand scheme of things might be small, but they just feel like such a luxury to have.
Track linking allows you to select a number of tracks that are not grouped, and being able to quickly adjust all of the volume, panning, sends, EQs, as if they were grouped. Being able to completely customize the way your plugins are listed can also increase your productivity.
There seems to be a search bar for nearly everything you could imagine. You can search for a specific plugin, a specific preset, even a specific track in your session.
The re-record feature is so simple in concept, but so useful to have at your fingertips. Activate re-record mode, and while you’re recording, if you decide that you already hate what you’ve done, simply press record and Cubase clears what you just played and bounces back to your start point (or pre-roll point) so you can try again. Sure it’s a small thing, but not having to hit stop, undo/delete, and record all over again can help you stay in the moment and focused on the idea you’re performing.
Here’s another great example of a QOL feature in Cubase 8. If you make a virtual instrument track, and then later create four MIDI tracks directly below the instrument track, the four MIDI channels will automatically be routed to channels 2, 3, 4, and 5 of the above instrument’s tracks VI. You can also quickly access your original virtual instrument from any MIDI track that is being sent to the instrument. Furthermore, render in place will separate each of the MIDI channels and audio-outputs of an instrument. This makes “printing” your instrument tracks fast and painless. For users of Kontakt, Omnishpere, and numerous other multi-channel instruments, this should make you smile. As you work more and more with Cubase, you realize just how helpful these little elements can be.
As I was wrapping up this article, I was working on some sequencing and I came across a quantizing feature that so perfectly captures the spirit of Cubase’s design philosophy. For both MIDI and Audio, the quantize “catch range” allows you to set up a graphically visible timing threshold that will tell Cubase to quantize any notes played within the range while leaving others untouched. This means you could have specific beats land perfectly on the grid, while preserving the human elements to the rest of the performance.
To put this in practical perspective, that means I can set the catch range to quarter notes, and play a sixteenth note stacatto string line, and I would know my pattern will always land on the beat, but there’d be a human element of randomness inside each beats phrase. Or you can sequence a drum groove and be sure your downbeats were locked, but the rest of the groove wasn’t so restrained. Again, this is a relatively simple idea, but there have been countless sessions that I’ve had to painstakingly select and quantize certain notes while leaving others untouched. This feature would have saved me a lot of time on those sessions.
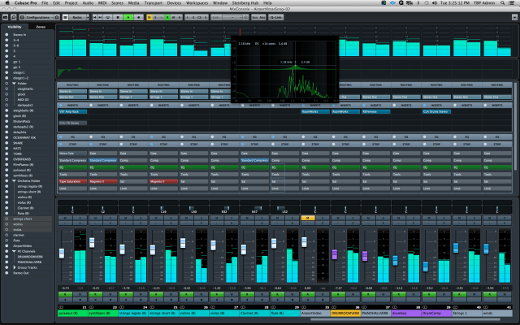
Mixer with quick EQ access.
Diving Deeper
Some of the best features of Cubase Pro 8 are the ones that really allow you to expand your workflow. For instance, track presets allow you to create instantly recallable audio, MIDI, and instrument that not only retain the plugins you used, but also the presets or patches inside the plugin.
This means I can setup a preset that will load Kontakt on an instrument track, with the specific instruments/patches recalled, as well as the right number of MIDI tracks below, all routed to the proper Kontakt instrument channels. You might make a vocal preset that has your favorite vocal chains, or a preset to handle your favorite methods of drum routing. You can take this a step further and save a preset that recalls your favorite drum tracking setup. This one preset could load up all your usual drum channels, with the proper I/O, your go-to plugins in each one, and even busses for parallel compression. All of this is recallable in any session, at the click of a button. This feature alone is a massive time saver.
Track versions gives you the ability to assign a group name to a specific take in a track. An example of this would be having track versions for clean and explicit lyrics. When you selected “clean lyrics” all vocal tracks that were assigned to this version name would be brought to the front and vice versa with the explicit vocal tracks. All the while your tracks retain the same automation and processing.
This allows you to create multiple mixes or variations of a song effortlessly. Perhaps you want to demonstrate several different potential concepts to a client. With track-versions you could line up various arrangements, and present each one quickly.
Chord Tracks and Chord Pads, allow you to quickly utilize your song’s chord progressions, or explore other possible harmonic ideas. With chord tracks, you can have Cubase learn the chord progression from an already existing MIDI track, or you can manually enter in your own chords. You have deep control over how the chord is voiced, inversions, tensions, and more. You can then use the chord track to trigger other VIs or even a vocal harmonizer.
Chord pads let you play with different chord progressions and you can set complexity thresholds which will start to extend the various chords Cubase might suggest based on the current chord. This isn’t a feature everyone might use but it is fun to just see where a progression can go and try things you might never have thought of. For those that might remember Band in the Box, this is like that, but far more intelligent.
The arranger track is a brilliant tool that allows you to define segments of your session into sections labeled A,B,C,D, etc. For example, you could set your intro as A, verse 1 as B, verse 2 as C, a pre-chorus as D, the first chorus as E, and so on. In the arranger track, you can tell Cubase to play you your song in any order you like. So if you’d like to hear your song with an extra chorus, or a double verse, or one less verse, you can do this remarkably fast. You can repeat segments or leave ones out completely.
Not only is this completely non-destructive, not only can you playlist the arranger tracks to listen to multiple potential arrangements of your song, but you can then tell Cubase to generate you a completely new session, with the song re-constructed in the arrangement you chose. This is an undeniably invaluable tool for writers and collaborators.
Cubase Project window with arranger track, video track, track folders.
PLUGINS AND VI’S
There are no lack of plugins and virtual instruments that accompany Cubase Pro 8. They cover the usual suspects and when you include the actual channel strip, you get quite a few toys to play with.
The plugins are solid and do the job. I wouldn’t venture to say they’ll replace anyone’s favorite aftermarket plugins, but for users that don’t already own a lot of plugins, they’ll be given a good launching pad to start from. You also get quite a few virtual instruments as well. While some of the patches (like so many soft synths these days) are drowned in enough reverb and delay to hide the fact that the patch doesn’t sound all that great, much of what you get is really flexible and fun to play with.
HALion Sonic SE is a light version of their multi-channel sampler. It offers a wide range of patches from acoustic instruments to synth leads and quite a few nice electric piano examples. Mystic features lots of pads, atmospheric patches, and sound-effect styled patches. Padshop is a granular synth that creates evolving pads and textures.
Prologue is a virtual analog synth, that is reminiscent of an Access Virus, but doesn’t quite have the punch needed to get all the way there. Where Prologue leaves something to be desired, Retrologue is a quality sounding synth with lots of character. It’s got all the features of a classic subtractive synth, and sounds impressively big for synth that’s included with the software.
LoopMash is one of the more notable instruments, and can easily cause you to lose some hours playing around with it. Essentially it’s a loop player that lets you layer multiple samples that you are able to slice, mash, warp, reverse, distort, mangle, and generally scramble up.
What makes it really fun to explore is that you set one loop to be the “master” loop and then LoopMash will start to take sounds from the other loops you’ve chosen and inject them into the master loop. It sounds confusing, and in some ways it is, but 30 minutes of play-time and you’ll be having a blast with this one. You also get a fun real time controller to add some spontaneity into the performance. In some ways, it’s reminiscent of Izotopes BreakTweaker plugin.
The VST Amp Rack is also an impressive plugin that comes standard with Cubase. It features a variety of simulated amps and cabinet’s, mic placements, pre and post amp pedal effects, and more. A good amp simulator can be a useful tool, especially on non-guitar tracks, and the VST Amp Rack does the job splendidly. There’s a great attention to the natural detail of amp breakup, and each distortion channel has a unique quality about it, especially when you listen to the sustain of a longer note.
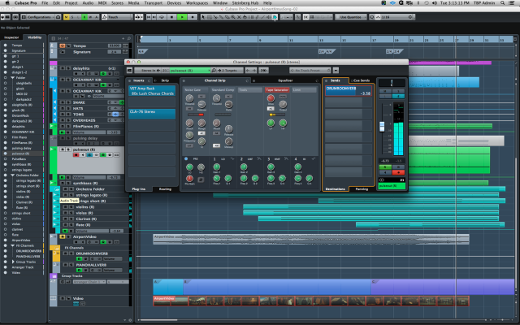
The channel strip in Cubase Pro 8.
Conclusion
Cubase 8 Pro is packed with powerful features and innovative concepts. The software makes a great effort to keep you in the driver’s seat by allowing you to control your own process.
While it’s not inexpensive, the $549.99 price tag for the pro-version does fall soundly in the middle range of other full featured DAWs. For your investment, you are given a massive array of tools, solid to great-sounding plugins, and a workflow that should really make creative folks ecstatic. As a songwriter and composer, I’m very happy to see Cubase on my laptop’s dock.
Again, I would urge Steinberg to accelerate the retina compatibility, and you shouldn’t need an eLicenser to at least demo the program.
But overall, I think many pro and amateur DAW users out there would really appreciate what Steinberg has done with their software.
There’s so much going on under the hood, that after several weeks, it’s clear that I have still just scratched the surface. I’ve not even looked at the notation side of the program of yet.
So I will spend the next 60 days working as exclusively with Cubase Pro 8 as possible, and report back with some updates on the Cubase experience. It’s clear that Steinberg is continuing to push not only what a DAW should sound like, but what it should feel like.
— Andrew Koss is Owner and Producer of Terminus Recording Studios in New York City.
Please note: When you buy products through links on this page, we may earn an affiliate commission.
Hina Hashmi
August 22, 2015 at 1:20 pm (9 years ago)Cubase Pro 8 Review This is really interesting, You are a very skilled blogger.
Ginger Anderson
October 11, 2016 at 8:16 am (8 years ago)Cubase is very good, but Ableton is the best. It is the most creative music-making software for composing, producing, performing, DJing and remixing. What is Live? Ableton Live 9 bridges the gap between studio and stage with an intuitive workflow that lets you do just about everything in real time. Powerful time-stretching, arranging and sequencing capabilities let you quickly create and capture musical ideas, turn them into finished productions, and take them to the stage. Ableton Live 9 is designed to let your creativity flow with Multi-track audio recording at up to 32-bit/192 kHz, a highly versatile array of instruments, effects and sounds, plus it works with instruments and controllers of all kinds. I found great tutorials here: http://topmusicmakers.com