


New Software Review: “Neutron”, iZotope’s Latest Mixing Plug-in
Unmask your mix with the new “Masking” feature in iZotope’s Neutron — an intuitive way to address competing frequencies within your tracks.
Sometime in the past few years, I’ve noticed what I like to think of as a “third wave” of DAW-based processors emerging.
What started years ago as the promising possibility of plugin-augmented mixing has morphed into a full-scale “console-in-the-box” situation, where mixing entirely within your DAW can finally save time and money without sacrificing anything on a sonic level.
iZotope is at the forefront in imagining up this latest wave of audio tools for both music and post production mixing. Their latest offering is called Neutron, and it provides a new take on the all-in-one channel strip concept—with a few innovative features that can’t yet be found anywhere else. Let’s see what it’s all about.
Overview
Neutron is available only as a plugin for your DAW (no standalone app here), and is compatible with Pro Tools (10-12), Logic Pro X, Ableton Live 9, Cubase Pro 8, Reaper 5, FL Studio 12, Studio One 3 and Nuendo 7. Supported operating systems are Mac OS X 10.9-10.12 and Windows 7-10. Neutron retails for $249, or $349 for the “Advanced” version.
It is a powerful mixing tool that provides advanced EQ, compression, transient shaping, harmonics, and much more, promising to give users a truly complete mixing tool inside one affordable plugin.
As a supplement to this review, I’d suggest that anyone interested Neutron check out iZotope’s website, where you can find detailed video demos of its various features. These videos are extremely helpful in breaking down, both visually and sonically, what this plugin is really all about.
One of my favorite things about iZotope is their dedication to creating comprehensive and informative videos that explain, simply and efficiently, what their plugins can do for you and how you can best make use of their features. Consider it the next-generation version of the refreshingly well-written user manual.
Features and Use
One of the things I like most about Neutron is that it’s simultaneously a very complex plugin, and a very intuitive one. If you’re familiar with other iZotope products—especially the newer versions of Ozone or Alloy—the layout of Neutron should feel very familiar to you.
Neutron is broken up into five basic modules: Equalizer, Compressor 1, Compressor 2, Exciter and Transient Shaper.
Neutron utilizes iZotope’s spectacular hybrid EQs, which allow for switching between Static and Dynamic mode processing. The dynamic mode offers the ability to expand or compress the EQ band based on a set threshold. I wrote about Static vs. Dynamic mode in my review of iZotope’s Final Mix plugin. You can find more on iZotope’s dynamic equalizer here.
One awesome addition to the EQ palette in Neutron is the new “Learn” function which, according to the Neutron manual, “analyzes a signal and places nodes on areas of interest (such as fundamentals, resonances, sibilances, build-ups and more).”
This is a powerful feature that saves time and effort, allowing for automatic location of the most potentially problematic areas of your individual track that require EQ attention.
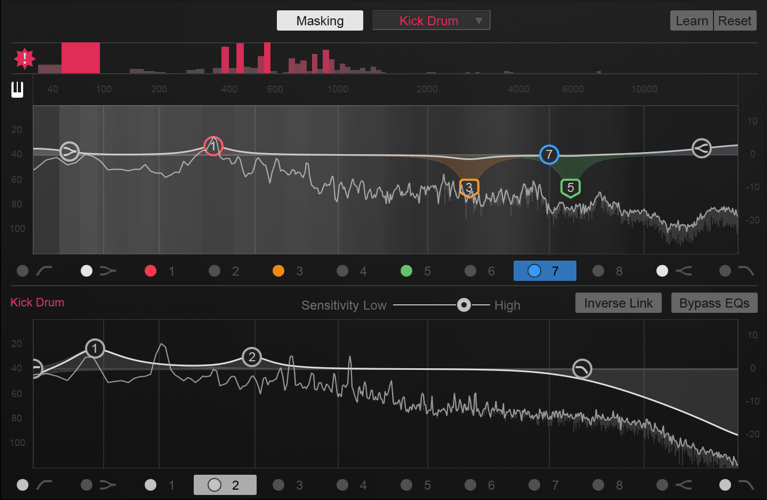
“Masking” is another breakthrough feature of Neutron’s EQ module that no other plugin company has attempted before, to the best of my knowledge.
But first, what is “masking”? It occurs when the frequency range of two different tracks in your mix are competing with each other, thus blocking—or “masking”—one another in sometimes problematic ways.
To use this Masking feature, you simply add Neutron to both of the offending tracks, label them inside Neutron for easier workflow, and then select the Masking feature in the EQ module. This brings up a live “masking meter” (a heat map of sorts) that shows you where your tracks are competing with each other.
From here, you can either tell Neutron to “learn” where to place its EQ nodes by analyzing your main track and the masked track, or you can dial in your own settings.
One of the most useful aspects of the Masking feature in Neutron is the “Inverse Link” button. Inverse Link does all the work of adjusting the EQ of both of your masked tracks at the same time.
As mentioned in the Neutron manual, “When on, each node’s gain and frequency are linked to the same-numbered node in the other EQ. For example, if you add a 3dB boost in node 4 of the source EQ, you’ll cut 3dB in node 4 of the target EQ below it.”
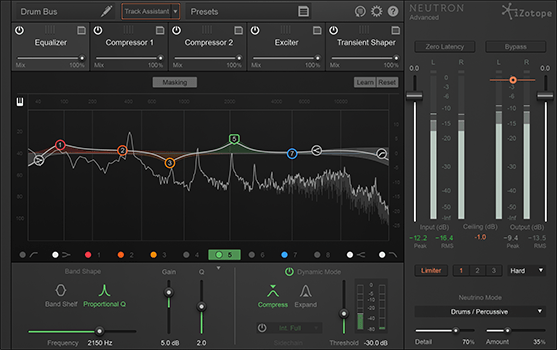
A closer look at Neutron’s EQ, which features the unique ability to switch between “Static” and “Dyanmic” mode processing, along with iZotope’s powerful “Learn”, “Masking”, and “Inverse Link” functions.
This is truly one of those “How did they do that?” features.
Certainly, some experimentation is needed to find which direction you want to go, and it’s also worth mentioning that very little goes a long way with Inverse Link, since you are effectively doubling the dB level of each boost or cut you make. And of course, there will be times when you’ll simply want to use the Masking heat map as a guide to make EQ cuts on one track without boosts on the other.
To me, the Masking feature of Neutron is worth the price of admission alone. You can learn much more about the Masking feature and hear it in action here.
The “Track Assistant” feature is a great way to get moving in Neutron fast, especially for less-experienced mixers. Imagine explaining to an engineer, even 10 years ago, that someday there would be a plugin that analyze your source and create an EQ, compression and harmonics chain custom-tailored specifically for that track.
There are three main modes for Track Assistant: Subtle, Medium and Aggressive:
“Subtle” uses fewer EQ nodes as well as gentler Compression and Exciter settings. “Medium” features a base level of gentle “do-no-harm” settings that users can build from. And “Aggressive” applies heavier compression and generally more EQ and harmonics.
There are also three presets that go along with Track Assistant, that further tailor these modes: Broadband Clarity, Warm and Open, and Upfront Midrange.
“Broadband Clarity” is mostly reductive, and is best used to deal with muddiness and upward masking. It features a gentle, wide Q on EQ boosts, and clean and transparent compression.
The “Warm and Open” preset focuses on adding body and punch to the instrument. Heavier compression is applied as you choose higher aggression settings.
“Upfront Midrange” focuses on adding midrange and “air” EQ boosts. Most settings feature a wide Q and are designed to be musical. This preset removes potential mud that may be masking midrange frequencies and uses parallel compression to add an edge to the mix.
Track Assistant is an incredibly powerful way for less experienced mixers and musicians to see in an instant how Neutron can be used to shape your tracks.
In my tests on vocals and acoustic guitars, I found the default (Medium, Broadband Clarity) to be fairly heavy-handed with the compression by default, especially in the midrange.
It’s certainly interesting to see and hear how Neutron reacts to various tracks, but in general I found Track Assistant would likely be the most useful for less-experienced users who need help finding a starting point.
“Exciter” is a harmonic distortion module that brings the warmth and grit of tubes and tape machines into the plugin world, allowing you to add saturation and life to your tracks. In keeping with iZotope’s multiband tradition, you can use Exciter as either a blanket single-band processor, or to provide up to three discrete bands, allowing you to blend differing amounts and types of harmonic distortion across the low, mid, and high bands.
I’m a big fan of harmonic distortion, especially in the context of DAW-based mixes, and I found that iZotope’s Exciter to be one of the best ways available to achieve natural-sounding tape and tube warmth. I already use the Exciter in Ozone 7 across my mix bus on every mix I do, and it is a huge part of the sound of my mixes.
Neutron’s “Transient Shaper” module allows you to manipulate the attack and sustain of a sound, which is typically very helpful with drums and percussive instruments.
Transient Shaper can be thought of as a smart multiband version of one of my favorite pieces of outboard gear: The SPL Transient Designer. This is one of those modules that really takes some critical listening and experimentation to get the hang of. But once you do, it’s remarkable what this module can do to help add punch and power to kicks, snares and toms. You can see and hear this module in action here.
Neutrino is iZotope’s version of console emulation. It’s available as a standalone, free (yes, free) plugin, and also as part of the I/O section of Neutron. Neutrino’s goal is to “improve the overall spectral balance of an entire mix by making subtle changes to each individual track on which it’s being used.”
In my tests, Neutrino did seem to make a pretty drastic sonic difference. Switching the Zero Latency button on and off effectively disengages Neutrino, allowing for a pretty decent opportunity to A/B. Tracks sounded fuller, sharper and more “processed” overall with Neutrino on and the Zero Latency button disengaged.
Neutrino offers four modes: Vocals/Dialogue, Guitar/Instrument, Bass, and Drums/Percussive.
iZotope stresses in the manual for Neutron that these modes are merely a starting point, and that users should feel free to experiment with the sound of the different modes to hear which sound best for your particular track. (Novel advice for every engineer! Use your ears, not your eyes.)
Neutron provides two “Compressor” modules. The first is a modern, multiband-style compressor which can be used for surgical de-essing and fine-tuning your tracks.
The second Compressor module is set to “Vintage Mode”, which iZotope describes as a “warm program-dependent compressor with a non-linear release.” This is a more traditional musical compressor similar to an 1176 or LA-2A, which provides very warm and clean compression for vocals, bass, guitars, etc.
All of the compressors in Neutron sound absolutely fantastic, and in my opinion would compete with the top compressor plugins on the market. Each module allows you to adjust the mix blend per band, allowing limitless options for dynamic shaping.
Finally, it’s worth mentioning that the advanced version of Neutron offers surround sound support up to 7.1 and provides the individual EQ, Compressor, Transient Shaper and Exciter modules as their own separate plugins.
Summing it Up
No mincing words is needed here: Neutron kicks some serious ass. iZotope continues to be the leader in groundbreaking audio plugins that are packed with features but don’t break the bank.
Neutron is, in my opinion, the single best bang-for-your-buck on the plugin market today. Whether you’re a veteran music or post production mixer, or just starting out as a musician or an engineer, Neutron combines world class audio processing with unparalleled flexibility.
I would encourage you to see and hear for yourself how Neutron can improve your workflow and your mixes.
Zach McNees is a Brooklyn-based producer/engineer/mixer and live recordist whose work includes Björk, Rob Thomas, The Gregory Brothers, Pixies, and many more. Zach’s post-production work includes House Hunters International (HGTV), VICE (HBO), All-American Makers (Science Channel) and the award winning documentary short “For The Love of Dogs”. Get in touch with Zach at http://www.zachmcnees.com.
Please note: When you buy products through links on this page, we may earn an affiliate commission.