


Life or Death Pro Tools Tips: Developing Your Tracking Template
A great session template can make all the difference between having a fast, productive, enjoyable session, and wasting hours spinning your wheels, stopping and starting throughout.
The evening before a tracking session, there are plenty of preparations to make, but none is more important than our focus here today: Prepping your “Tracking Template”.
Having an efficient template set up in advance can save time, money and energy—as well as help keep the focus of the session on creativity instead of minutia. And, at the end of the day, if you’re not all set and ready to record seamlessly when it comes time, the magic moment may be lost.
Start with the Skeleton: Creating Your Record Tracks
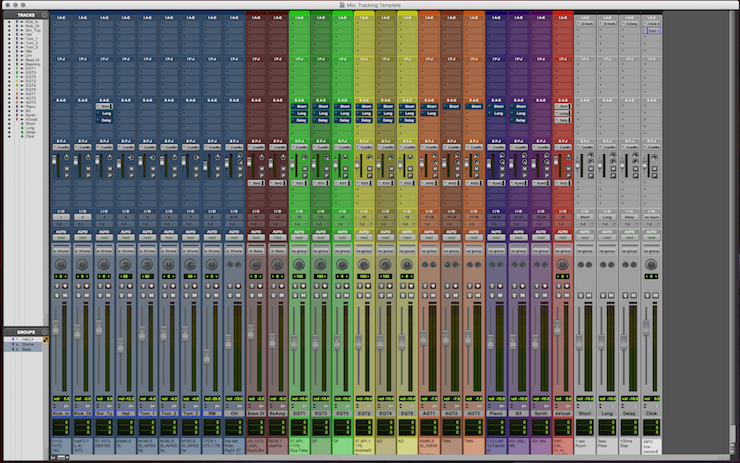
Building a good Pro Tools template starts by launching a brand new session and creating tracks for every instrument. And I mean every instrument.
Labeling is important—for both finding tracks now and for later file management—so be specific and use color-coding to help you navigate quickly. Choose a color scheme that looks attractive and makes sense to you. Why not blue drums, maroon bass, green electric guitars and so on? This way, in the heat of the battle you’ll be able to recognize what’s what without even thinking.
Prepping the Pro Tools template should also include creating tracks for every possible overdub with pans and levels roughly set. Expecting two to three passes of acoustic and electric guitar overdubs is always a safe bet for artists who are tracking live. It’s also rare that you won’t be recording at least one or two additional vocal passes at some point, so create extra tracks in anticipation of these as well. There should be a percussion track ready, and a miscellaneous a track in case the organ that “nobody claimed they would use” suddenly becomes vital.
Tracking should really be as simple as hearing the player mention an overdub or instrument change and hitting “record ready” on the track you made last night. Any possible instance should be covered so you don’t have to think about inputs or outputs or how the player will hear the track.
If you’re afraid of visual clutter on big sessions, it’s always possible to “hide” the tracks that you’re unlikely to use until later on in the day or week. A single click on the bullet next to any track name in the track list at the upper left of your session can quickly hide excess tracks until you need them, and a single click can quickly bring them back into view.
If you decide on your routing—including effects, ins, outs and headphone sends—and prep it ahead of time, it’s one less thing to distract you when you need to focus on tailoring the tone of that next pass.
Creating Your Effects Template
Once your record tracks are prepped, it’s time to add the reverbs and other effects you’ll plan on using.
Choose plugins that aren’t CPU intensive to help avoid DAE errors, and don’t use this as an opportunity to try out something new. Tried-and-true, simple staples are go-tos for tracking sessions because time is valuable.
If a special effect is integral to a song or part, you should be aiming to record the effect at its source anyway. So grab a short reverb, a long reverb and a simple slap delay that you can manipulate quickly to fit the song and start there.
Next, establish your effect sends. You’ll want to prep the vocal track to hit the reverb and delay, and may want to consider setting up a send on the snare or the piano as well.
Anything you can do to make it sound more like a record in the room will help the players explore that space. Catering to the musicians’ needs is vital to your success, and the biggest part of that on tracking day starts with the cue mix.
Set Your Cue Mix
To prepare a proper headphone mix that’s independent from the control room and tailor-built for the musicians, you don’t necessarily need an elaborate multi-channel headphone mixer. You can simply use an extra stereo output and put a pre-fader send across all the channels.
Fortunately, it’s easy to copy the current main mix faders positions to your headphone send as a starting point, and then tweak from there:
“Copy Fader to Sends” (CMD+OPT+H on a Mac) is a good key command to get something palatable into the headphones fast. Even a quick rough mix is better than faders at unity in most cases!
(Check out Roger Monejano’s “Shortcut Bible” here on SonicScoop for even more handy shortcuts to help get all of the I/O routing for your template together quickly.)
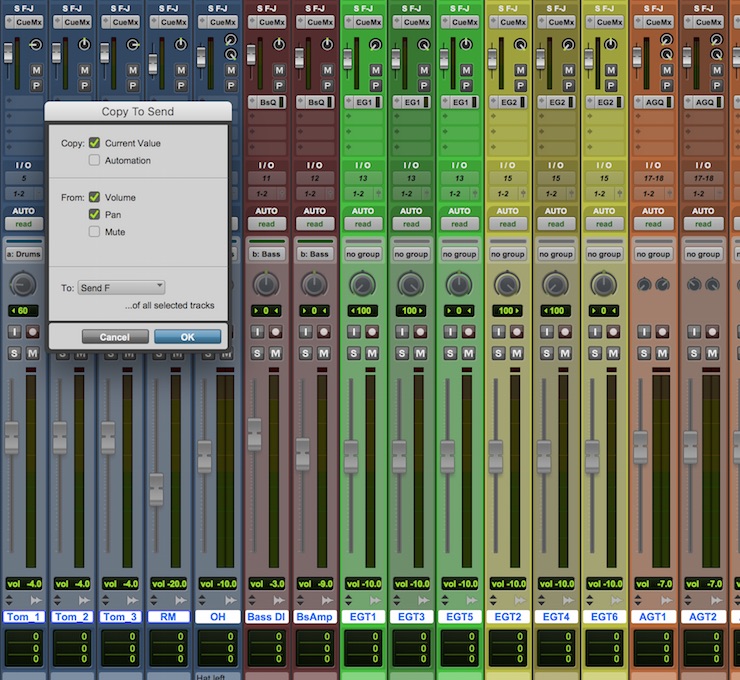
“Copy Fader to Sends” is an easy key command that will help you set up good headphone mixes quickly, whether you have a multi-channel headphone amp or a simple stereo one. CMD+OPT+H on a Mac.
Later on, when the band is actually playing, be sure to put on headphones and keep up with how the mix has changed. In the meantime, beware that players will usually want to start with a drum-heavy mix.
Once the session is going and a pass or two has gone by, don’t be afraid to ask the players if they need anything differently, and be sure to shy away from heavy reverbs, delays and effects in the players’ headphones, as that may affect timing. Though it’s important to set the scene by including a slap delay or a short plate on a snare, don’t go overboard and leave your musicians swimming, wondering where the downbeat is.
If you have a cue system that allows for multiple headphone mixes or provides separate channels for each player (a.k.a. “More Me’s”) , then you can use other vacant Pro Tools outputs as additional sends.
A Bass “More Me” send could allow for blending a Direct and Amp signal according to the players’ taste. A stereo Acoustic “More Me” might allow for the previous pass to be panned left and the new pass to go right.
Using extra Pro Tools sends for “More Me’s” enables players to get exactly what they need to perform in an inspiring way. It also allows quick swapping and tweaking. If for example, a guitarist needs another pass, his first pass can be pushed up in the mix and the “More Me” send can quickly be used on the new track.
If your system can’t support this, then you’ll just have to be extra diligent with the cue mix you’re sending out. Plenty of great songs have been recorded with a shared stereo mix that is well-tended to.
Cross Your 1s and Dot Your 0s
The last thing to do before packing up the template and calling it a night is to verify that the sample rate and bit depth meet the producer’s standards.
There’s a whole other conversation about what the “best” sample rate and bit depth to use are that we don’t need to dive into. But for the tracking engineer, the right answer is always “whatever the producer wants”. (Sometimes, hints can be found by examining any loops or pre-production that has been sent.)
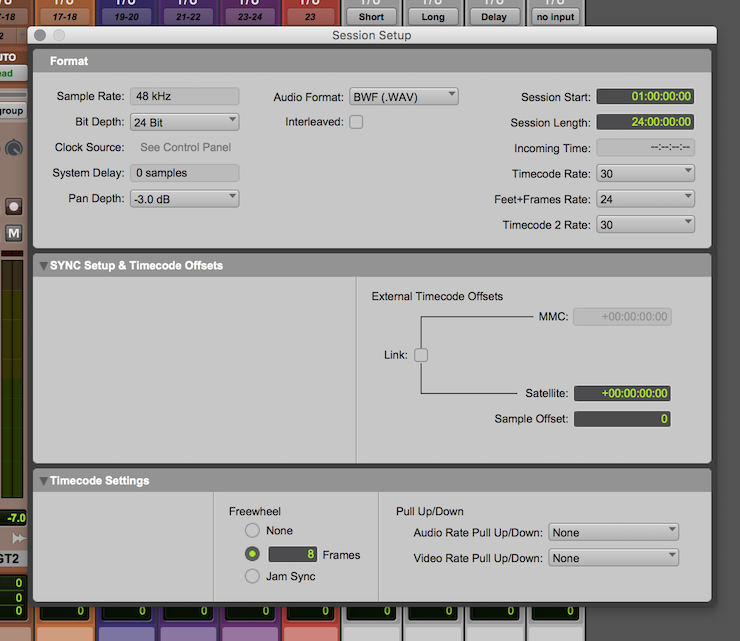
It’s never a bad idea to check the Session Setup window to make sure your Sample Rate and clock settings are correct! Access this window from the toolbar via Setup -> Session, or with CMD+Num2.
In this same vein, contemplate anything else that can help the producer after he or she leaves: Consider whether he prefers stereo tracks or mono tracks that are grouped, or whether he’ll want the chain you’re using documented in the comments field.
Many record labels require player names in the comments of each track, so get in the practice of documenting simple things like this. Other producers will ask that the first take be on playlist .01 as they can easily equate this with take one. It’s the simple things that earn a call back.
This is also a good time to check preferences if you’re on a communal rig. Are the fades set appropriately? Is the automatic backup feature configured correctly? Bad preferences can get you bogged down quickly.

Few preferences are more important than the Auto Backup settings. The default doesn’t back up nearly often enough for most professional purposes.
Now that the template is ready for its debut, close the session. With Pro Tools, by simply changing the extension from .PTX to .PTXT you can change your Pro Tools session into a Pro Tools template. Now, when you’re ready for a new tune you can open up the template .PTXT and it will create a new session with all your tracks ready to go. (Here’s your last chance to fix possible sample rate and bit rate issues!)
Armed with the proper tracking template, you’ll be able to focus on the most satisfying parts of engineering and not just on choosing the correct inputs and outputs. If all of the tracks are available and your routing is set in advance, then wait times are decreased allowing players to collaborate more freely. You’ll earn yourself a couple more minutes of tweaking that Snare EQ, and if you stay up on the headphone mix, you’ll make friends for life quickly with the players on the other side of the glass!
Click here for Life or Death Pro Tools Tips, Part 2: Tracking Day
Josh Ditty is an audio engineer who works in Nashville, TN.
Please note: When you buy products through links on this page, we may earn an affiliate commission.